3D Camera After Effect: The 2026 Guide to Cinematic Depth

You know the feeling: you have designed a beautiful set of style frames, but when you put them into motion, they feel flat. You want that high-end, broadcast-quality depth—the kind where the background slides elegantly behind the foreground. So, you add a camera layer, hit play, and… nothing happens. Or worse, the camera spins wildly out of control, ruining your carefully composed shot.
If you are a marketing designer or video editor, this is a common frustration. The leap from 2D layers to a 3D environment is one of the steepest learning curves in After Effects. The interface can feel counterintuitive, and a single wrong setting can break your entire animation.
This guide moves beyond basic theory to focus on the practical application of the After Effects 3D camera workflow. We will cover the specific settings, the essential “Null Object” rig that prevents chaotic movement, and the math behind perfect parallax. Whether you are building a cinematic title sequence or a complex product reveal, these steps will help you regain control of your timeline.
Further Reading: 3D Camera Tracker After Effects Not Working >
The Core Concept: Enabling 3D Space and the Z-Axis
The most common obstacle beginners face is creating a camera layer and seeing absolutely no change in the composition. This happens because After Effects layers are 2D by default. A 3D camera in After Effects can only “see” and manipulate layers that exist in 3D space. To fix this, you must change your mental model of the timeline from a flat canvas to a stage with depth.
The 3D Layer Switch
To enable this, locate the 3D Layer switch (represented by a cube icon) in your timeline panel for every layer you want the camera to affect.
Once clicked, the layer gains a third position value: the Z-axis depth.
- X-axis: Moves left and right.
- Y-axis: Moves up and down.
- Z-axis: Moves forward (closer) and backward (further away).
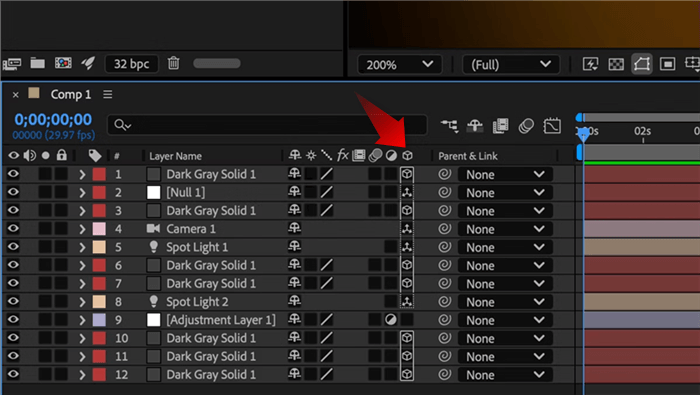
Click the cube Icon
Creating Parallax: The Scaling Rule
The secret to cinematic motion is parallax—the visual effect where foreground objects move faster than background objects. To achieve this, you need to push background layers far back in Z-space. However, pushing a layer back makes it look smaller.
To fix the size while keeping the depth, you must scale the layer up. Here is a practical rule of thumb to maintain your layout:
The Scale Math:
For every 1,000 pixels you push a layer back in Z-space, you generally need to increase its Scale by roughly 35-40% (depending on your camera’s focal length, typically 50mm).
Example: If you push a background texture to Z: +2000, it will look tiny. Scale it up to roughly 175-200%, and it will fill the frame again, but now it will move slowly and cinematically when the camera tracks past it.
Professional Workflow: The Null Object Camera Rig
Animating a camera directly often leads to frustration. Beginners frequently find that their camera spins uncontrollably between keyframes or moves on strange, curved arcs.
Here is a critical expert insight: Professional motion designers rarely animate the camera layer itself. Instead, they rely on a Null Object camera rig to maintain control. This separates the camera’s position from its rotation, preventing the dreaded “wobbly cam” effect.
One-Node vs. Two-Node Cameras
Before rigging, ensure you are using the right camera type. Go to Layer > Camera Settings.
- Two-Node Camera: Has a “Point of Interest” that it always looks at. While useful for orbiting a single product, it often fights against you during complex moves, causing the camera to flip unexpectedly.
- One-Node Camera: Functions like a handheld camera or a drone; it looks wherever you point it. For the rig below, we recommend a One-Node Camera.
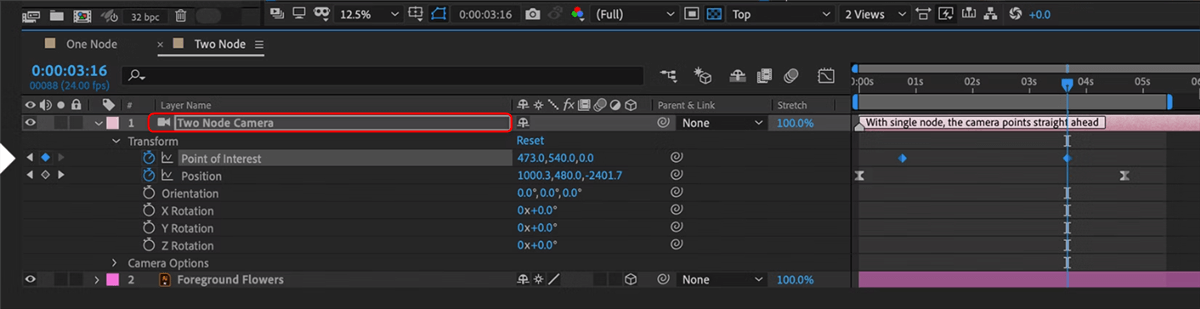
Two-Node Camera
Step-by-Step: Building the Rig
The industry-standard method is to create a Null Object (an invisible layer), place it at the center of your action, and “parent” the camera to it.
- Create the Null: Go to Layer > New > Null Object. Rename it “Camera Control.”
- Enable 3D: Turn on the 3D switch (cube icon) for the Null Object.
- Align Positions (Crucial Step): Before connecting them, ensure your Null Object and Camera are in the exact same position in space. If they are offset, your rotation will be lopsided. Select both layers, press P, and copy the Camera’s position data to the Null.
- Parent the Camera: Select your Camera layer and use the “Pick Whip” (spiral icon) to drag it to the Null Object.
How to Animate the Rig
Now that you have rigged the camera, you never touch the Camera layer again. All animation happens on the Null. Here is how to achieve specific moves:
- For Orbiting (The “Matrix” Effect): Select the Null and press R to open Rotation. Animate the Y Rotation. Because the camera is parented to the Null, it will swing perfectly around your scene.
- For Dollying (Zooming In/Out): Select the Null and press P to open Position. Animate the Z Position to move physically closer to your subject.
- Avoiding Gimbal Lock: Do not use the “Orientation” property or the generic Rotate tool (W) to animate the Null. This often causes “Gimbal Lock,” where the camera flips wildly when two axes overlap. Always animate the separate X, Y, and Z Rotation properties (found by pressing R) for smooth, predictable motion.
Adding Cinematic Polish: Depth of Field & Motion Blur
Once your motion is smooth, you can elevate your animation from “functional” to “cinematic” using two key features: Depth of Field (DOF) and Motion Blur. These settings mimic the physics of real-world lenses.
Enabling Depth of Field
To create a soft, blurry background that draws the eye to your subject:
- Double-click your Camera layer to open Camera Options.
- Check the box for Enable Depth of Field.
- Adjust the Aperture value (higher values = more blur) and the Blur Level.
- Set the Focus Distance to match the Z-position of your main subject.
The “Draft 3D” Warning
Be aware that enabling DOF and Motion Blur significantly increases render time. To work efficiently, you might turn on Draft 3D (the rocket icon in the timeline toolbar).
Important: Draft 3D temporarily disables Depth of Field and Motion Blur to keep your preview fast. If your blur suddenly disappears, check if this icon is active. Do not panic—the effects are still there and will appear when you render, or when you turn Draft 3D off to check your work.
Troubleshooting: Why Is My Camera Not Working?
Even experienced designers encounter moments where the camera tool seems to stop working. If you find yourself dragging the camera tool with no result, run through this diagnostic checklist.
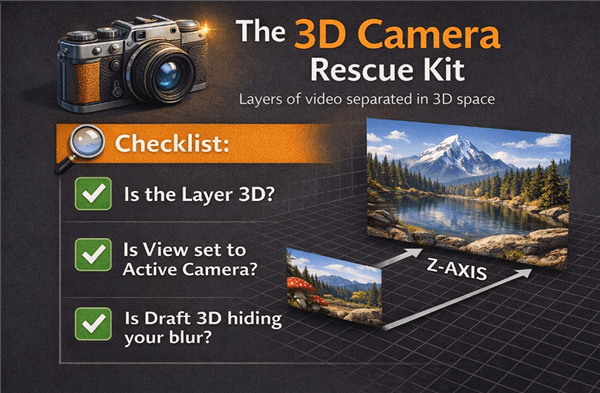
The 3D Camera Rescue Kit
1. Is the Layer 3D?
The most frequent error is neglecting the 3D switch on the target layer. If the layer does not have the cube icon toggled on, the After Effects 3D camera will ignore it completely. It will remain a 2D element stuck to the front of the screen, regardless of camera movement.
2. Check Your View Mode
Ensure your composition viewer is set to “Active Camera.” Often, users accidentally switch to “Front,” “Top,” or “Custom View” to align elements. In these orthographic views, the camera’s perspective is not rendered, so your animation will look static even if keyframes are present.
3. Smooth Out Robotic Motion
If your camera moves correctly but feels “robotic” or mechanical, the issue is likely your keyframe interpolation. By default, After Effects uses Linear keyframes.
- Select your Null Object keyframes.
- Press F9 (Easy Ease).
- Open the Graph Editor to adjust the speed curve. A slight “S-curve” creates a natural ease-in and ease-out, mimicking the weight of a real camera dolly.
Is After Effects Always the Right Tool?
For a designer like Kevin—or anyone tasked with explainer videos—the goal isn’t always to master technical rigging. The goal is to produce a polished video efficiently.
If you are creating a high-end commercial, a title sequence, or an immersive abstract environment, the After Effects 3D camera is essential. The rigorous workflow described above is the only way to achieve that specific, high-fidelity look.
However, if your primary goal is to create software tutorials, app demos, or screen recordings with a “3D feel,” manual keyframing in After Effects is often an inefficient use of resources.
The Alternative for Tutorials: FocuSee
For projects that simply need to zoom in on a mouse click or pan across a UI, building a full 3D Null rig is overkill. In these specific scenarios, tools like FocuSee offer a focused alternative.
- Automated Zoom & Pan: Instead of manually plotting X, Y, and Z coordinates for every mouse movement, FocuSee automatically detects cursor actions and applies smooth camera motions, giving the feel of 3D camera movement without the complexity.
- Simulated Depth & 3D Motion: By applying subtle background blur, cursor highlights, and smart motion tracking, FocuSee mimics the Depth of Field and parallax effects typical of true 3D workflows—all in real-time.
- Time-Saving Efficiency: These automated 3D-like motions let you create engaging, dynamic videos in minutes rather than hours, making it ideal for tutorials, demos, and presentation recordings.
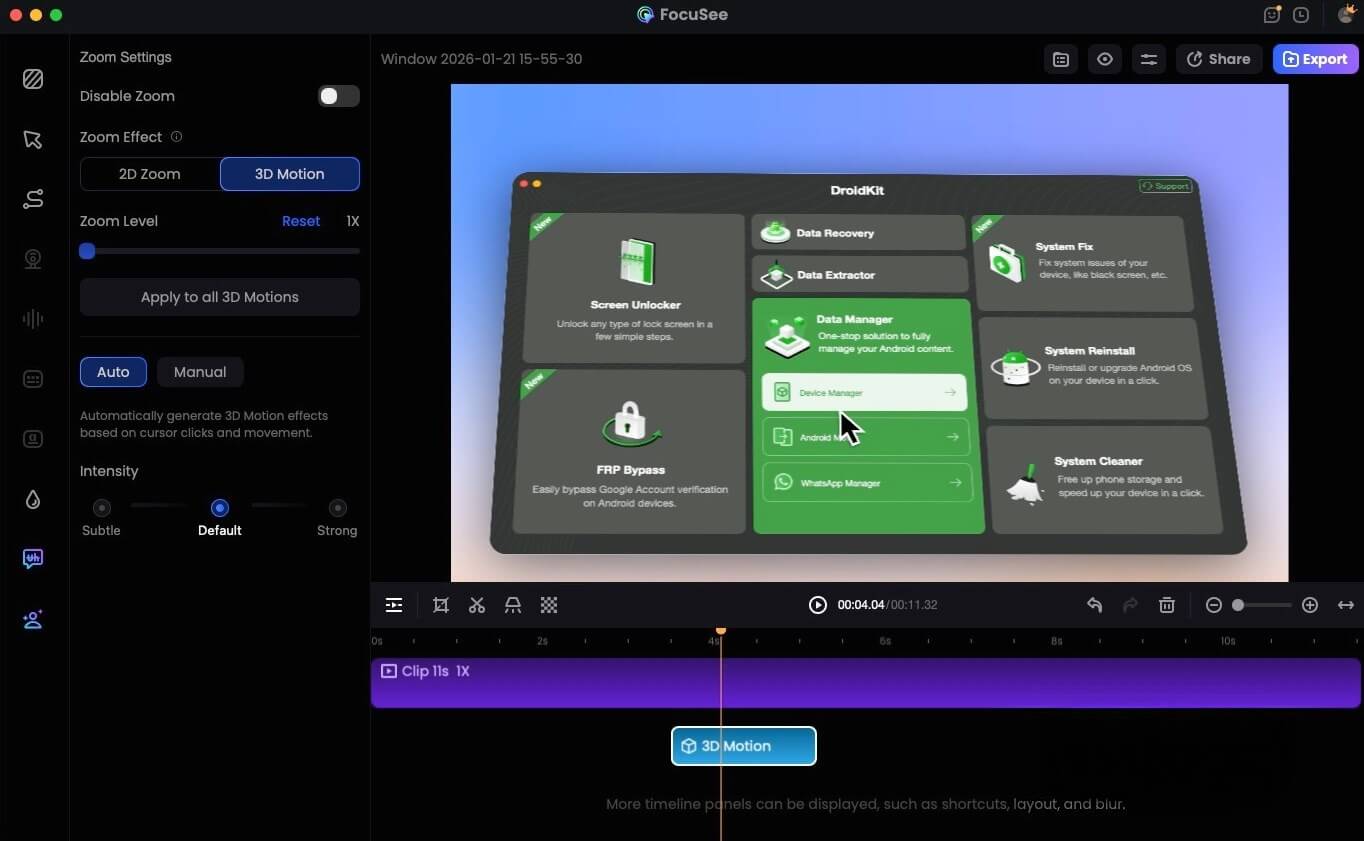
FocuSee 3D Motion
Strategic Comparison:
| After Effects 3D Camera | Smart Recording Tools (FocuSee) | |
| Best Use Case | Title sequences, custom motion graphics | Software tutorials, product demos |
| Setup Time | High (Hours to set up layers/rigs) | Low (Minutes to record/edit) |
| Control | Infinite (Pixel-perfect control) | Automated (Optimized for speed) |
| Render Load | Heavy (Depends on hardware) | Lightweight |
Common Questions About 3D Cameras
What is a 3D camera in After Effects?
A 3D camera in After Effects is a layer that simulates a real-world optical device within the software’s 3D coordinate system. It allows you to view and move around 3D layers, creating depth, perspective, and parallax effects.
How do I fix the camera flipping unexpectedly?
This is usually caused by “Gimbal Lock” or the “Point of Interest” fighting your movement. To fix it, use a One-Node camera and parent it to a Null Object. Animate the Null’s X, Y, and Z Rotation properties individually rather than using the Orientation tool.
When should I avoid using a 3D camera in After Effects?
Avoid using a 3D camera for simple 2D projects where depth is not required, such as basic lower thirds or flat character animation. Enabling the 3D renderer increases processing time. For simple screen recordings, automated tools are significantly faster.
Conclusion
Creating professional depth in After Effects is not just about turning on a switch; it is about controlling the environment. By understanding the Z-axis, mastering the scaling math for parallax, and utilizing the Null Object rig to separate position from rotation, you can transform flat layers into immersive experiences.
The difference between an amateur animation and a cinematic sequence often lies in these fundamental workflows. Take the time to set up your rig correctly, smooth out your keyframes in the Graph Editor, and your camera work will finally match the quality of your design.