How to Create Training Videos: The Ultimate Step-by-Step Guide

I am an HR technology specialist who has tested multiple workflows over the past five years to help non-technical managers turn live training sessions into scalable video content. This system has been used by 50+ HR professionals across Windows and macOS to standardize onboarding without large budgets.
Creating employee onboarding videos can feel overwhelming without technical or video production experience—especially when dealing with complex tools and unclear structure.
🏆 Golden Rule: Start with learning objectives, not software. Effective training videos are built around what the viewer should be able to do after watching.
This guide provides a simple, step-by-step workflow to plan, record, and produce professional training videos efficiently and affordably.
Types of Training Videos (And When to Use Each)
Not all training videos serve the same purpose. Choosing the right format dramatically improves engagement.
- Onboarding Videos – Introduce company culture, processes, and tools
- Software Tutorials – Step-by-step system walkthroughs (screen-focused)
- Compliance Training – Policy and regulatory education
- Product Training – Internal or customer-facing product demos
- Microlearning Videos – Short, focused lessons (2–5 minutes)
- Scenario-Based Training – Real-world simulations for soft skills
Tip: Most companies fail because they treat all training content the same.
Choosing Your Software: Snagit, Loom, and FocuSee
When you plan your project, evaluating your software options is a mandatory first step. Traditional timeline-based editors (like Adobe Premiere) demand heavy technical skills, resulting in a high risk of project abandonment.
| Snagit | Loom | FocuSee | |
| Primary Use | Screen capture & basic tutorials | Quick async video messaging | Automated tutorial creation |
| Ease of Use | Easy | Very easy | Very easy |
| Recording Type | Screen + webcam | Screen + webcam | Screen, webcam, audio (multi-track) |
| Editing Capability | Basic trimming & annotations | Minimal | Advanced (auto-editing, smart cut) |
| Automation Features | ❌ None | ❌ None | ✅ Auto zoom, AI cut, cursor highlight |
| Output Quality | Medium (manual polish needed) | Casual | Professional with minimal effort |
| Best For | Simple how-to guides | Quick team communication | Polished training/tutorial videos |
| Cloud Dependency | ❌ No (local) | ✅ Yes | ❌ No (local export) |
| Learning Curve | Low | Very low | Low |
| Pricing Model | One-time purchase | Freemium | Paid (desktop software) |
To make an informed choice, examine three beginner-friendly tools that require only basic computer literacy:
- Loom: Excellent for quick, informal async communication. It is cloud-based and highly intuitive, making it great for firing off a quick update. However, it lacks advanced post-production editing features if you need a highly polished final asset.
- Snagit: A staple for basic instructional design. Snagit is perfect for quick screen grabs and simple annotations. It is cost-effective, though its video editing capabilities are quite basic, meaning you still have to manually trim mistakes.
- FocuSee: A screen recording tool specifically built for automated editing. For users who lack video production experience, FocuSee includes features like Smart Focus (which automatically zooms in on your cursor clicks), an AI Smart Cut feature that instantly removes filler words and long pauses, and built-in annotation tools that allow you to add text, arrows, and highlights directly on the screen to emphasize key actions and guide viewers step by step.
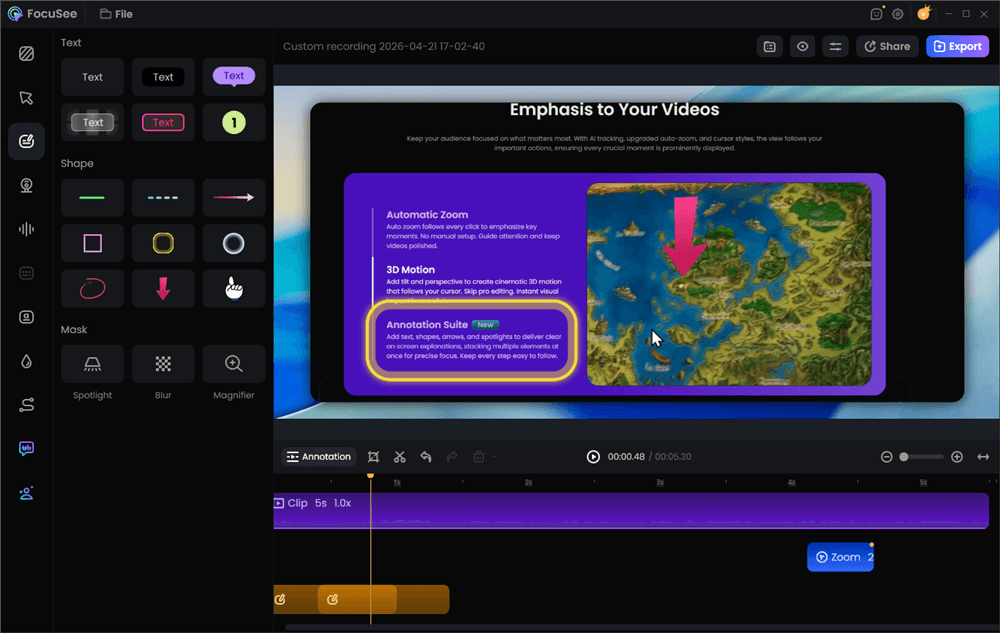
Add Annotations for Clarity
Selecting the right software significantly reduces the obstacles associated with standard video creation . For informal updates, Loom is fantastic. If you want a polished, professional result without learning how to manually edit clips, FocuSee is an exceptional choice.
The Low-Budget Recording Setup: No Studio Required
You do not need to rent a studio or buy a thousand-dollar camera. You can achieve excellent results in a standard office using a laptop, provided you follow a few basic environmental rules.
Bad video quality is forgivable; bad audio is not. If your viewers cannot hear you clearly, they will instantly close the video.
- Lighting: Never sit with a window directly behind you, as this turns you into a dark silhouette. Instead, sit facing a window. Natural, indirect sunlight provides the most flattering, professional lighting available, and it is completely free. If you are in a windowless office with harsh fluorescent lights, place a small, inexpensive ring light or desk lamp directly behind your laptop webcam.
- Webcam Placement: The biggest visual mistake beginners make is looking down at their laptop. Prop your computer on a stack of books or a stand so the camera lens is exactly at eye level. This creates a natural, conversational angle.
- Audio Environment: Fluorescent lights often hum, and open offices echo. Record in a small room with soft furnishings (like carpets or curtains) to absorb sound. If your office is inherently noisy, avoid using your laptop’s built-in microphone. A basic $30 USB headset microphone will isolate your voice and block out background noise effectively.
Step-by-Step Production: From Planning to Final Export
Instead of guessing how to put everything together, follow this structured end-to-end workflow designed specifically for non-video professionals.
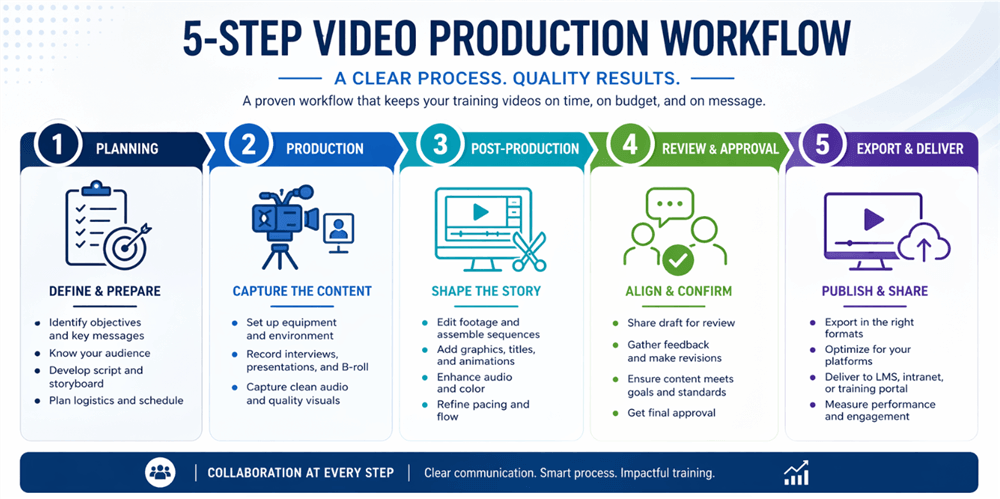
Training Video Production Workflow
1. Planning and Segmenting by Use Case
Apply basic instructional design principles by defining your core learning objectives first. Your approach must shift depending on the type of content you are creating:
- Software Tutorials: If you are teaching an employee how to use a new CRM, the video should be screen-heavy. Keep your face small in the corner, focus heavily on cursor movements, and keep the runtime under three minutes.
- Compliance or Soft-Skills Training: If you are delivering HR policy updates or leadership training, the video should be face-heavy. People connect with people. Look directly into the camera, use a warmer tone, and rely on real-world scenarios rather than just reading slides.
2. Scripting with an Actionable Template
Do not improvise. Winging it leads to rambling, which destroys engagement. Use a two-column storyboard script to map out exactly what the viewer will see and hear.
Copy and paste this downloadable template framework into your word processor to structure your next video:
| Visuals / Screen Action | Audio / Voiceover Script | |
| Hook (0:00 – 0:15) | Webcam full screen. Host looking directly at the camera at eye level. | “Are you tired of manually resetting employee passwords? Today, you will learn the exact three steps to automate password recovery.” |
| Body: Step 1 (0:15 – 0:45) | Screen recording begins. Cursor hovers over the ‘Settings’ gear icon. | “First, navigate to your administrator dashboard and click the Settings icon in the top right corner.” |
| Body: Step 2 (0:45 – 1:30) | Auto-zoom in on the ‘Security’ tab. Highlight the toggle switch. | “Next, scroll down to the Security tab and toggle the ‘Enable Self-Service Recovery’ switch to the ‘On’ position.” |
| Conclusion (1:30 – 2:00) | Return to full-screen webcam. Text overlay with a support email address. | “By enabling this toggle, your team reclaims hours of admin time. For detailed documentation, click the link below this video.” |
3. Recording
Open your screen recording software. Prepare your environment using the low-budget setup tips above. If you struggle to present confidently, use a built-in teleprompter app to display your script near the webcam lens. This allows you to maintain eye contact and a steady pace.
4. Editing
If you recorded manually using a basic tool, you will need to trim your mistakes. Cut out long pauses, remove “ums,” and ensure your screen actions sync with your voice. If you process your recording through automated software like FocuSee, the AI handles this heavy lifting for you, drastically reducing your editing time to a quick final review.
5. Publishing
Export the final file in a standard format like MP4, ensuring it is ready for distribution across your company’s network.
Structuring Training Modules for Microlearning
A major obstacle for corporate educators is that employees simply abandon long training modules. To fix this, you must apply the concept of microlearning, which involves breaking complex topics into short, highly targeted segments.
When structuring your content, strictly limit the runtime to a single topic per video. If you are teaching a ten-step software onboarding process, do not create one 45-minute video. Create ten separate 3-minute videos. Long, rambling sessions lead to poor completion rates. Concise, targeted modules accommodate the viewer’s busy schedule, reduce cognitive overload, and significantly improve overall engagement metrics during employee onboarding.
Tracking LMS Integration and Engagement Metrics
Creating the media file is only the first part of your procedure. To ensure your efforts actually yield results, you must establish a reliable post-production evaluation framework. This involves hosting your files securely and tracking performance through proper LMS (Learning Management System) integration.
Upload your finished MP4 files directly to your organization’s LMS. A dedicated LMS provides detailed analytics that simple file-sharing lacks. You can monitor critical data points to verify learning outcomes:
- Completion Rates: Are employees actually finishing the module?
- Drop-off Rates: If data shows a massive drop-off at the two-minute mark, you know exactly where the content became boring or confusing, allowing you to refine your script for the next batch.
- Quiz Scores: Post-video assessments prove whether the knowledge was retained.
This analytical approach validates the return on investment for your production efforts. It shifts your focus from merely producing content to actively ensuring the content drives real-world skill development.
Common Mistakes to Avoid
Avoid these common pitfalls:
- Starting without clear learning objectives. Results in unfocused content and low retention
- Making videos too long→ Leads to drop-offs; keep each video 2–5 minutes
- Ignoring audio quality→ Viewers tolerate bad visuals, not bad sound
- Overloading visuals with information→ Causes cognitive overload; keep one key idea per screen
- Skipping analytics and feedback→ No data = no improvement; track completion and drop-off rates
Frequently Asked Questions
How do I choose the best software for a beginner?
Assess your technical comfort. For quick, unpolished updates, use Loom. For basic screen grabs, try Snagit. For polished videos that require auto-zooming and automatic removal of filler words without manual editing, FocuSee is highly recommended.
Do I need professional equipment?
No. You can produce excellent content using a standard laptop. Focus on finding natural window lighting and elevating your webcam to eye level. Invest $30 in a basic USB microphone, as clear audio is much more important than a cinematic camera.
How long should my videos be?
Ideally, keep them between two and five minutes. Shorter formats prevent cognitive overload and align perfectly with microlearning strategies, guaranteeing higher completion rates.
What is the best way to record without making mistakes?
Write a two-column script beforehand. During recording, use a teleprompter tool that floats near your webcam lens. This keeps your eyes up, maintains your confidence, and prevents you from losing your place.
Where should I host the final files?
Host them on your company’s Learning Management System (LMS). This keeps proprietary corporate information secure, ensures the right departments have access, and allows managers to track viewer data and quiz scores.
Overcome Technical Barriers and Scale Your Training Today
Overcoming the frustration of unengaging employee onboarding requires adopting a structured procedure, not acquiring a massive production budget. When you struggle to plan effectively or lack technical skills, diving straight into complex software only complicates your day. By focusing on your learning objectives first, utilizing practical scripts, and adopting automated tools to handle the tedious editing, you completely change the dynamic of your corporate education.
You can finally produce materials that secure high completion rates and clearly measure effectiveness. Stop letting technical barriers delay your organizational growth. Apply these straightforward steps today, grab your laptop, and start building an onboarding experience your employees actually enjoy.