How to Create a High-Impact Testimonial Video in 2026

Creating a powerful testimonial video often feels like an impossible choice. You need compelling social proof from your best client, but they’re across the country—or an ocean. The options seem limited: a pixelated, unprofessional Zoom recording that undermines your brand, or a high-cost production that drains your budget. This guide provides a tested solution for how to create customer testimonial videos that look and sound professional for under $200.
The key is the “Authenticity Paradox”: 2024 engagement data shows viewers trust polished, user-generated content more than slick, cinematic productions. A video shot on a modern smartphone feels genuine, but a studio production can feel like an ad. Our strategy combines this raw visual authenticity with professional-grade audio to build credibility and drive conversions.
Also Read: The Tangible Benefits of Video Marketing in 2026 >
The ‘Remote Director’ Protocol: A Step-by-Step iPhone Video Testimonial Setup
This protocol transforms a logistical challenge—like a marketer in New York filming a client in London—into a manageable process. It ensures you receive high-quality raw footage without needing to be in the room. This iPhone video testimonial setup is designed to overcome the most common remote recording failures: poor audio and unstable, poorly-lit video.
1. Assemble and Ship the ‘Mobile Production Kit’.
Your first step is to control the variables that matter most. Send your client a small package containing a smartphone tripod, a phone clamp, and a wired lavalier microphone (or lav mic). A wired lav mic that plugs directly into the phone’s charging port is the most reliable option, as it eliminates Bluetooth pairing issues and guarantees crisp audio.
Pro-Tip: Make the process frictionless for your client. Include a pre-paid return shipping label and a simple, one-page setup diagram in the box. This small touch shows respect for their time and dramatically increases the chances you’ll get your equipment back promptly.
2. Schedule Two Separate Calls.
The first call is a 15-minute technical check to set up the equipment and find the best location. The second call is for the actual interview. Separating these prevents technical troubleshooting from disrupting the interview’s flow and making your client feel flustered.
Pro-Tip: During the tech call, ask your client to record and send you a 10-second test clip. This allows you to confirm that the audio levels are correct and the lighting looks good before the main interview, preventing any surprises.
3. Coach Framing and Lighting Remotely.
During the tech call, join a video meeting on a laptop while your client sets up their phone on the tripod. Guide them to a location with a clean, uncluttered background. For lighting, you can create a professional look with items they already have.

Lighting Setup
- Good: Have the client sit facing a window. The natural, soft light is flattering and easy.
- Better: If the window is to their side, place a simple lamp on the opposite side to fill in shadows.
- Best (for any time of day): Ask them to find a desk or table lamp. Remove the lampshade and position it about 45 degrees to one side of them, slightly above their eye line. If the light is too harsh, they can bounce it off a white wall or tape a piece of paper over it to act as a diffuser.
4. Configure and Lock the Camera Settings.
This step is what separates a polished recording from an amateur one. Instruct your client to use their phone’s rear-facing camera, which has the superior sensor.
- Recording Format: Have them record in 4K at 30fps. If they have an iPhone 15 Pro or newer, guide them to enable ProRes Log recording. This captures more visual data, giving you incredible flexibility for color correction later.
- Lock Exposure and Focus (AE/AF Lock): This is the most critical step. Once they have framed the shot, instruct them to tap and hold on their face on the screen until a yellow “AE/AF LOCK” box appears. This prevents the phone’s camera from automatically changing the brightness or focus if they move slightly. A flickering, “breathing” video instantly signals that it was shot on a phone by an amateur. Locking the settings ensures a stable, professional-looking image.
How to Ask B2B Testimonial Video Questions That Elicit a Compelling Story
A perfect technical setup is wasted if the content is flat. The goal is to guide your client to tell a story, not just list features. Asking the right B2B testimonial video questions is essential for creating a case study narrative that resonates with potential customers.
To overcome the “awkwardness factor,” spend the first five minutes of the interview call building rapport. Ask about their day or a recent project. Reassure them that this is a low-pressure conversation, not a performance, and that your editing will make them look and sound great. This helps them relax and deliver more natural, authentic sound bites.
Instead of closed-ended questions like “Do you like our product?”, use these open-ended prompts:
- “Before you started working with us, what was the primary challenge or frustration you were trying to solve?”
- “Can you describe the ‘aha’ moment when you realized our solution was truly working for you?”
- “What has been the most significant measurable result you’ve seen since implementation? (e.g., time saved per week, percentage increase in revenue, etc.)”
- “What specific feature do you find the most valuable, and can you walk me through an example of how you use it?”
- “How has our solution changed your team’s day-to-day workflow for the better?”
- “If you were recommending us to a colleague facing the same challenges, what would you say?”
Pro-Tip for Dynamic B-Roll: To make your final video more engaging, ask your client one final question: “Could you share your screen and record a 30-second clip of you using that favorite feature you just mentioned?” This screen recording provides valuable B-roll footage you can use to cut away from their talking head, making the final story more visual and compelling.
Manual vs. Automated: Choosing the Right Testimonial Video Workflow
Before starting your next project, it’s important to select the right workflow. The manual ‘Remote Director’ protocol offers maximum control but requires a significant time investment. Alternatively, dedicated software automates much of the process. This comparison will help you decide which approach aligns with your resources and goals. For more in-depth comparisons, you can see our on the best tools available.
| Criteria | Manual “Remote Director” Method | Automated Software (e.g., FocuSee) |
| Success Rate | Moderate–High Depends on client tech skills |
High–Very High Guided prompts + checks |
| Time Cost | High Scheduling + manual editing |
Low Automated capture & edits |
| Technical Skill | Moderate Lighting, audio, editing |
Low Built for non-technical users |
| Overall Cost | Low (cash), High (time) | Moderate (subscription) |
| Recommendation | One-off, high-control projects | Teams scaling video reliably |
The Smart Alternative: Create Polished Testimonials in Minutes with FocuSee
For marketers and creators who value speed and reliability, a dedicated tool like FocuSee provides a more efficient solution than manual direction. It is a paid software tool designed to solve the most common pain points in testimonial video production through smart automation.
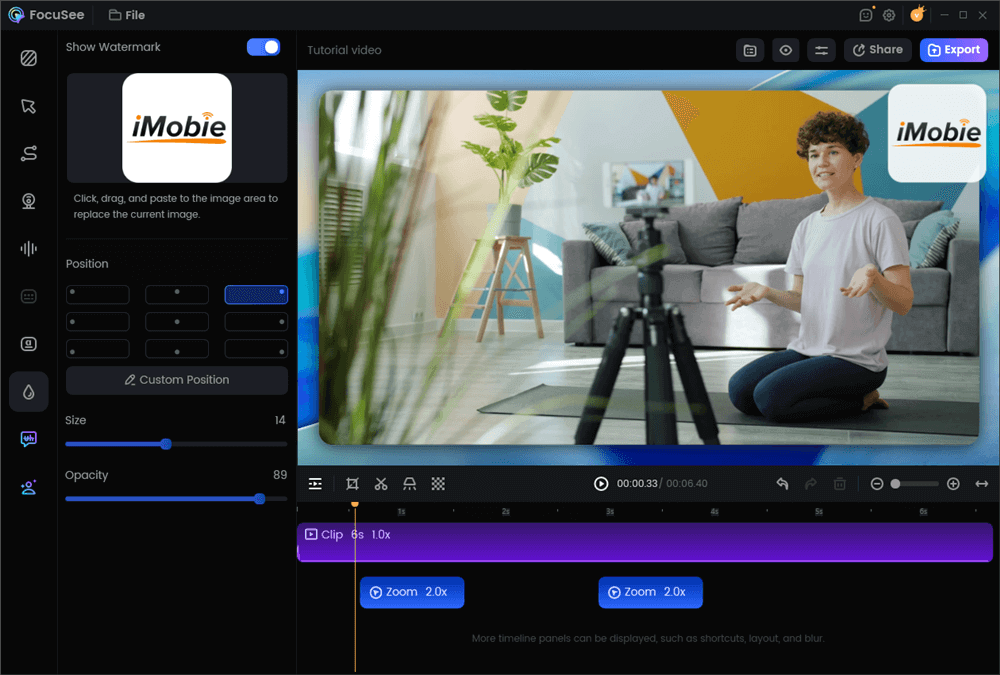
Add a Watermark on a Video
Here’s how FocuSee addresses the key challenges we’ve discussed:
- Solves Tedious Editing: Manually editing out pauses and filler words can take hours. FocuSee’s AI Smart Cut automatically detects and removes awkward silences (“ums,” “ahs”), transforming raw footage into a concise, professional narrative in minutes.
- Eliminates ‘Audio Quality Anxiety’: Even with a lav mic, background noise can degrade credibility. The built-in AI Noise Removal cleans the audio track, ensuring your client’s voice is crisp and clear, which is critical for building trust.
- Ends ‘Asset Fatigue’: Re-editing a horizontal video for every social platform is inefficient. FocuSee includes multi-size presets that instantly reformat your video for any aspect ratio (9:16 vs 16:9). You can export optimized versions for your landing page, TikTok, and Instagram Reels from a single project, maximizing your conversion rate optimization (CRO) efforts.
Post-Production Essentials: The Release Form and Distribution Strategy
Once your video is edited, two final steps are critical for maximizing its value and protecting your business: securing legal permissions and executing a smart distribution strategy.
Secure Usage Rights with a Professional Release Form
Before publishing a testimonial, you must get your client’s written permission. A simple email is not enough, especially for paid advertising. A signed video testimonial release form is a non-negotiable legal document that grants you the right to use their name, likeness, and statements.
Instead of grabbing a generic template online, ensure your form includes these key clauses:
- Clear Identification: Full names of the client (“Releasor”) and your company (“Releasee”).
- Scope of Permitted Use: Explicitly state where you can use the video (e.g., website, social media, paid ads, internal training). The broader, the better.
- Duration of Use: Specify if the rights are granted in perpetuity (forever) or for a limited time.
- Right to Edit: A clause that permits you to edit the footage for clarity, length, and style.
- No Compensation: A statement that the client is not receiving financial compensation for their testimonial, which protects its authenticity.
International Consideration: If your client is in a region with strict privacy laws, like the EU (GDPR), it is wise to consult with a legal professional to ensure your release form is compliant. This protects both you and your client.
Implement a Content Atomization Strategy
Don’t just upload the full video to your website. Atomize the content to get the highest possible return on your effort. From one primary 2-3 minute horizontal (16:9) case study narrative, you can extract multiple assets:

Serve the Right Video to Every Device
- Three 30-Second Vertical (9:16) Clips: Edit the most impactful sound bites into short, vertical videos for TikTok, Instagram Reels, and YouTube Shorts. Always add captions.
- Two Quote Graphics: Pull the most powerful sentences and create static images for LinkedIn and Twitter.
- B-roll Footage: Use supplemental footage, such as screen recordings of your product, as visual content for other marketing materials. This is a key part of building a library of marketing assets.
Conclusion
Creating high-quality testimonial videos no longer requires a massive budget or complex logistics. You can direct a professional-looking shoot from anywhere in the world with a simple production kit and a clear plan. The biggest hurdles—audio quality, unstable video, editing time, and asset repurposing—are all solvable.
For those ready to scale their efforts and eliminate the manual work, a tool like FocuSee is the most direct solution. Instead of coordinating calls and spending hours editing, you can produce a polished, multi-format testimonial ready for distribution in minutes. Empower yourself to capture powerful social proof without the friction. Explore how FocuSee can streamline your workflow today.