Do you struggle with black screen recordings? We’ll cover you! This article addresses the frequent issue of screen recording becoming dark and offers practical alternatives. Recording lectures, game playing, or Powerpoint presentations with a blank screen might reduce productivity and experience. The first step to fixing black screen recordings is understanding why. Graphics card issues, wrong settings, program incompatibilities, and hardware limits might cause this issue. To fix screen recordings, find the reason.

Fix My Screen Recording Black
Six proven methods can help you fix the screen recording black issue. To simplify implementation, each solution will include step-by-step instructions and high-quality screenshots. Gemoo Recorder, a strong screen recording tool, will be an extra tip to improve your recording experience. Our detailed tutorial will help you diagnose and repair the screen recording black problem. Let’s start filming screencasts again without black screens.
Also read: How to Fix FaceTime Screenshots Not Saving?
Why Does My Screen Recording Black?
It’s irritating and perplexing when you try to capture your screen; all you see is black. There might be several causes for this problem, and pinpointing each is crucial for developing a workable solution.
My Screen Recording Black
- Graphics card problems: If your graphics card drivers are outdated or don’t work with your computer, they can stop you from recording the screen and give you a dead screen.
- Incorrect Display Settings: If your display settings aren’t right like if the size or frame rate aren’t the same, it can cause problems with screen recording, like a black screen.
- Software Conflicts: Black screen records can be caused by problems between the screen recording apps and other apps or background processes.
- Hardware Limitations: Insufficient memory or computational capacity, for instance, can make it difficult to record the screen and result in a monochrome display.
You may solve the black screen while screen recording by finding the cause. Here we’ll go through six tried-and-true methods for fixing this issue and getting better results from your screen recordings.
Also read: How to Fix Videos Not Playing on Twitter >
6 Ways to Fix My Screen Recording Black
Don’t worry if your screen is blank when you record it. You may address this issue in many ways. We’ll discuss six solutions to the problem and how to apply them in the following sections.
Check Graphics Card Drivers
Step 1: Press Windows+X to open Device Manager. Add additional goods to the “Display adapters” area.
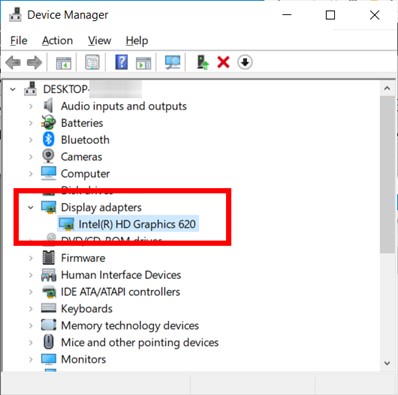
Add Display Adapters
Step 2: Right-click on the graphics card driver update and pick “Update driver.”
Step 3: Select driver auto-update, follow the instructions to update.
Step 4: After the update is complete, restart your computer to redo the screen recording.
Adjust Display Settings
Step 1: Open Display Settings by right clicking your mouse.
Step 2: In the settings make sure the “Display” tab’s resolution is set to the optimal setting for your screen.

Adjust Display Settings
Step 3: Go down and tap “Advanced display settings.”
Step 4: Check to see whether your refresh rate is set properly.
Step 5: If it isn’t already open, open “Display adapter properties.”
Step 6: Click the “Monitor” menu and pick the fastest refresh rate your screen supports.
Step 7: Select “Apply” and then “OK” to commit the changes.
Disable Hardware Acceleration
Step 1: Launch the screen capture program you’ll be using.
Step 2: Click the “Settings” or “Preferences” button.
Step 3: Try to find a choice that utilizes a graphics processing unit (GPU) accelerator.
Step 4: Disable this option.
Step 5: Stop recording for now and save your settings.
Step 6: If you think the problem has been fixed, try recording your screen again.
Close Unnecessary Applications
Step 1: Open Task Manager with Ctrl+Shift+Esc.
Step 2: Click the “Processes” tab to stop the process utilizing the most CPU and memory.
Stop CPU Processes
Step 3: Right-click the application or process you wish to end and choose “End task” from the context menu.
Step 4: Stop any running background tasks.
Step 5: If recording fails, restart the software.
Update Screen Recording Software
Step 1: Go to the main page of your screen recording application.
Step 2: Check for updates and download the latest if available.
Step 3: Apply the patch, then reboot.
Try a different screen recording application if the issue persists.
Check Hardware Resources
Step 1: Close background applications and tasks.
Step 2: Check memory and data space.
Check Memory and Space
Step 3: Upgrade RAM or storage if your screencasts are choppy.
Try one of these techniques to solve your screen recording. If the troubleshooting methods don’t work, you may require technical assistance or help with your system configuration.
Bonus Tip. Record Screen with Gemoo Recorder
Gemoo Recorder is an alternative to some built-in screen recording tools that you may use if you’re having trouble recording your screen. With its intuitive interface and customizable settings, you can easily record your screen for various purposes. Whether you are a content creator, educator, or business professional, Gemoo Recorder is a valuable tool to have in your arsenal. Here, as a bonus tip, we’ll guide you through the process of using Gemoo Recorder, step-by-step, so you can start recording your screen like a pro.
Step 1. Get Gemoo Recorder and set it up on your computer. Start the program up and choose “Screen Only” from the panel.
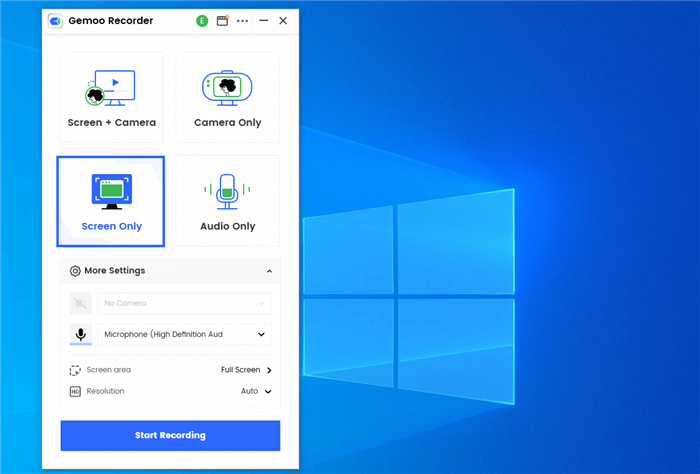
Choose the Screen Only Mode
Step 2. You may choose a specific window to record. The recording will start in 3 seconds.
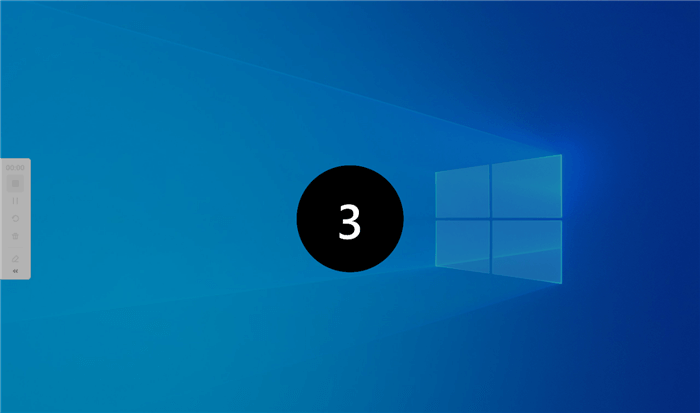
Wait for the Recording Countdown
Step 3. Annotations, highlighting and images can all be done throughout the recording process.
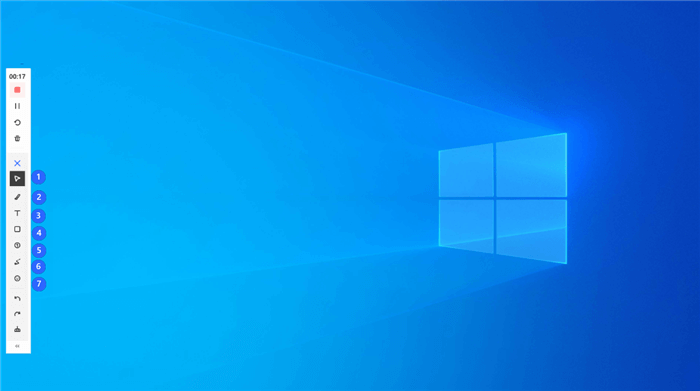
Begin to Record
Step 4. To stop recording, just press the “Red Stop” button when you’re done. Watch the video you just produced so you can make any changes or remove the boring or unnecessary parts.
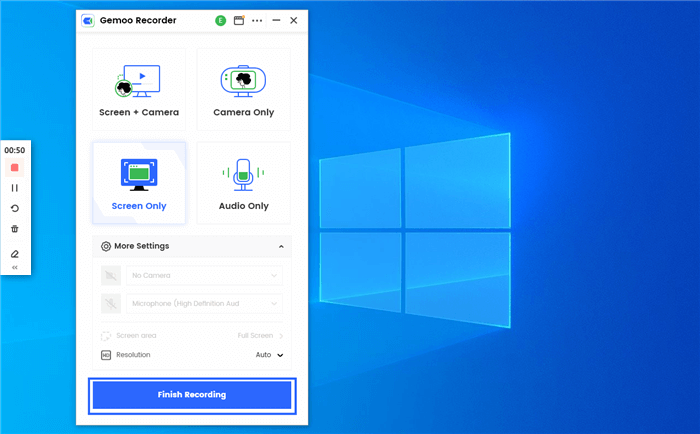
Finish Recording
Gemoo Recorder’s easy-to-navigate interface is great for both novice and seasoned users. Gemoo Recorder is a dependable option for screen recording owing to its powerful recording capabilities and extra features.
Final Thought
We know that a screen recording with a blank screen might be frustrating, but there are solutions. Identifying problems’ fundamental causes, such as outdated drivers, inappropriate settings, or software incompatibilities, is required to fix them. In addition, there is dependable and user-friendly alternative screen recording software to consider, such as Gemoo Recorder. Please read the instructions carefully and make the necessary changes to your system settings as instructed. You may fix the black screen issue while recording your screen and keep on making high-quality recordings if you take the appropriate approach and use the right troubleshooting techniques. Please feel free to forward this post to anybody you think will benefit from it and to leave any questions or comments below.