How to Screen Record on iPhone 13: Audio, Editing & Pro Tips

Apple hides the screen recording button by default. Even when you find it, you might hit record, narrate a perfect tutorial, and send the video—only to realize later that it’s completely silent. It is a frustratingly common issue: the video captures what is on the screen, but your voice is missing.
If you are struggling with iPhone 13 screen recording no sound, can’t find the tool in your Control Center, or are seeing a “black screen” when recording apps, this guide fixes those problems immediately.
We have restructured the standard recording workflow to ensure you never record a silent video again. Below, you will find the essential “Pre-Flight Checklist” to prevent interruptions, a unified guide for recording with or without a microphone, and expert tips on managing your files.
Phase 1: Enable the Screen Recording Tool
If you have just unboxed your device or reset your settings, the Screen Recording button is likely missing from your shortcuts. Before you can capture anything, you must manually add the tool to your Control Center.
Follow this verified procedure for all iPhone 13 models:
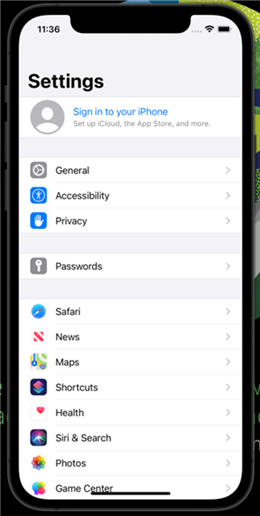
- Unlock your device and open the Settings app.
- Scroll down and tap Control Center.
- Scroll to the “More Controls” section (the bottom list with green plus signs).
- Locate Screen Recording and tap the green + (plus) icon next to it.
- The tool will move up to the “Included Controls” list. You can drag the three lines next to it to rearrange where it appears in your menu.
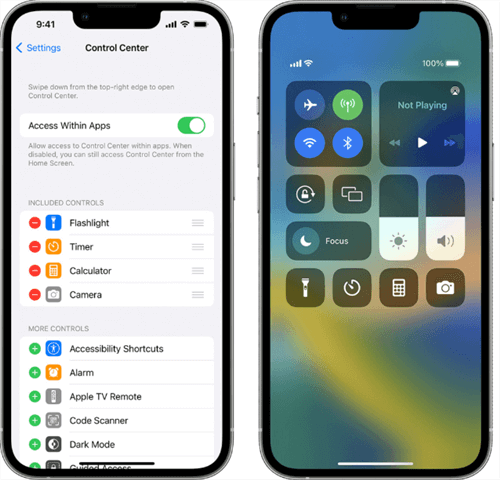
Control Center
Phase 2: The “Pre-Flight” Checklist (Do Not Skip)
Most screen recording guides skip this step, leading to ruined takes. Nothing looks less professional than a text message banner popping up during a tutorial, or a recording stopping abruptly because your storage is full.
Before you hit record, run this 10-second check:
1. Enable “Do Not Disturb”
Notifications will appear in your recording if you don’t block them.
Swipe down from the top-right to open Control Center, tap Focus, and select Do Not Disturb. This ensures a clean video free of private texts or email banners.

Do Not Disturb Mode
2. Check Your Storage
High-definition screen recordings consume space rapidly. If your iPhone 13 is near capacity, the recording will terminate automatically to preserve system functions.
Go to Settings > General > iPhone Storage. Ensure you have at least 1–2 GB of free space for a standard tutorial.
Check Your Storage
3. Verify Audio Output
If you are wearing AirPods, your iPhone might try to route the audio strangely.
For the clearest audio reliability, we recommend disconnecting Bluetooth and using the iPhone’s internal microphone unless you are using a dedicated external lavalier mic.
Phase 3: How to Record (With or Without Sound)
This is where most users get tripped up. The iPhone 13 has two recording modes: System Audio Only (default) and Microphone Audio (hidden).
Follow this workflow to ensure you capture exactly what you need.
Step 1: Open Control Center
Swipe down from the top-right corner of your screen (where the battery and Wi-Fi icons are). You should see the Screen Recording button (a solid circle inside a ring) that you added in Phase 1.
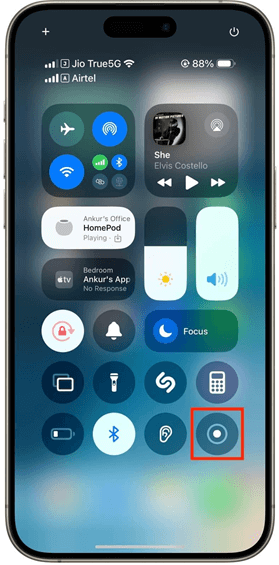
Tap Record
Step 2: Choose Your Audio Mode (Critical Step)
Do not just tap the button yet. Decide which audio source you need:
Option A: Quick Record (System Sounds Only)
- Best for: Reporting bugs, showing UI steps without talking, or recording a clip of a video/game.
- Action: Tap the button once. A 3-second countdown will start. It will record clicks, music, and game sounds, but not your voice.
Option B: Narrated Record (Voiceover + System Sounds)
- Best for: Tutorials, explaining a banking app to a family member, or social media commentary.
- Action: Long-Press (hold down) the Screen Recording button for one second. A hidden menu will expand.
- Tap the Microphone icon at the bottom to toggle it from Off (Grey) to On (Red).
- Tap Start Recording from this menu.
Step 3: Recording is Active
Once the countdown ends, the menu closes. You will see a red status bubble around the time in the top-left corner of your screen. This indicates the iPhone is currently capturing video.
Step 4: How to Stop Recording
When you are finished, do not return to the Control Center (this adds unnecessary footage to the end of your clip).
- Tap the red time bubble in the top-left corner.
- A system pop-up will appear asking if you want to stop.
- Tap Stop.
The video is automatically saved to your Photos app.
Troubleshooting: Common Audio & Video Glitches
Even with the correct settings, issues can occur. Here is how to troubleshoot the most common frustrations.
1. “My Screen Recording has No Sound”
If you used the “Long Press” technique and the microphone was Red (On), but the audio is still silent or faint:
- Volume Check: Ensure your ringer is on and the media volume is turned up.
- Bluetooth Conflict: As mentioned in the checklist, AirPods can sometimes cause a “handshake” error with the screen recorder. Disable Bluetooth in Control Center and try a test recording using the phone purely as a handheld device.
- System vs. Mic Confusion: Remember, turning the Microphone ON records outside sounds (your voice). It does not affect internal sounds (app music), which record automatically. If you want only internal sound, turn the Mic OFF.
2. The “Black Screen” (DRM Protection)
If you attempt to screen record apps like Netflix, Disney+, or Apple TV+, the resulting video will be a black screen with audio only.
- Cause: This is Digital Rights Management (DRM) enforcement.
- Solution: There is no legal workaround. You cannot screen record protected streaming content on iOS.
3. Video Saves as a “White Box” or Error
If your recording fails to save:
- Cause: Usually strictly related to low storage space. The iPhone attempts to process the temporary video file but fails to write it to the drive.
- Solution: Delete unwanted photos or offload unused apps, then hard restart your iPhone (Press Vol Up, Vol Down, then Hold Power).
File Management: Finding, Editing, and Sharing
After you tap “Stop,” the notification banner says “Screen Recording saved to Photos.” But where exactly?
Locating Your File
Screen recordings are video files, but searching for them in your “Recents” camera roll can be tedious if you have thousands of photos.
- Open the Photos app.
- Tap the Albums tab at the bottom.
- Scroll down to the “Media Types” list.
- Select Screen Recordings. This smart album isolates your captures, making them easy to find.
Trimming the Ends
Every screen recording has a “dead zone” at the start (when you close the Control Center) and end (when you tap the stop button).
- Open the video and tap Edit (top right).
- Locate the timeline at the bottom (the strip of images).
- Drag the Yellow Arrow on the left to cut the start.
- Drag the Yellow Arrow on the right to cut the ending.
- Tap Done > Save Video.
Sharing Large Files
A 60-second screen recording can easily exceed 100MB.
- AirDrop: The best method for sending to nearby Macs or iPhones.
- iCloud Link: If sending to an Android user or via text, do not send the raw file (it will be compressed and blurry). Instead, tap the Share Sheet > Options > Copy iCloud Link. This sends a high-quality streaming link.
Pro Tip: When Native Recording Isn’t Enough
The built-in iPhone screen recorder is perfect for quick clips, but once you start making content for TikTok, YouTube, online tutorials, or client demos, raw footage often becomes hard to follow. That’s because native recording focuses on capturing, not on explaining. Compared with the default iOS recorder, FocuSee adds several creator-grade advantages:
- Auto-Zoom on Key Actions: Automatically zooms into the area where interaction happens, so viewers don’t miss small buttons or text.
- Visible Tap & Focus Effects: Your invisible finger taps become simulated cursor clicks and focus points, making every action easy to understand.
- Better Viewer Guidance: Adds visual framing, motion tracking, and device frames to turn raw screen captures into structured tutorials.
- Subtitles & Audio Optimization: Automatically generates subtitles and balances audio, making videos usable even without sound.
In short, FocuSee doesn’t just record — it guides attention and reduces cognitive load for viewers.
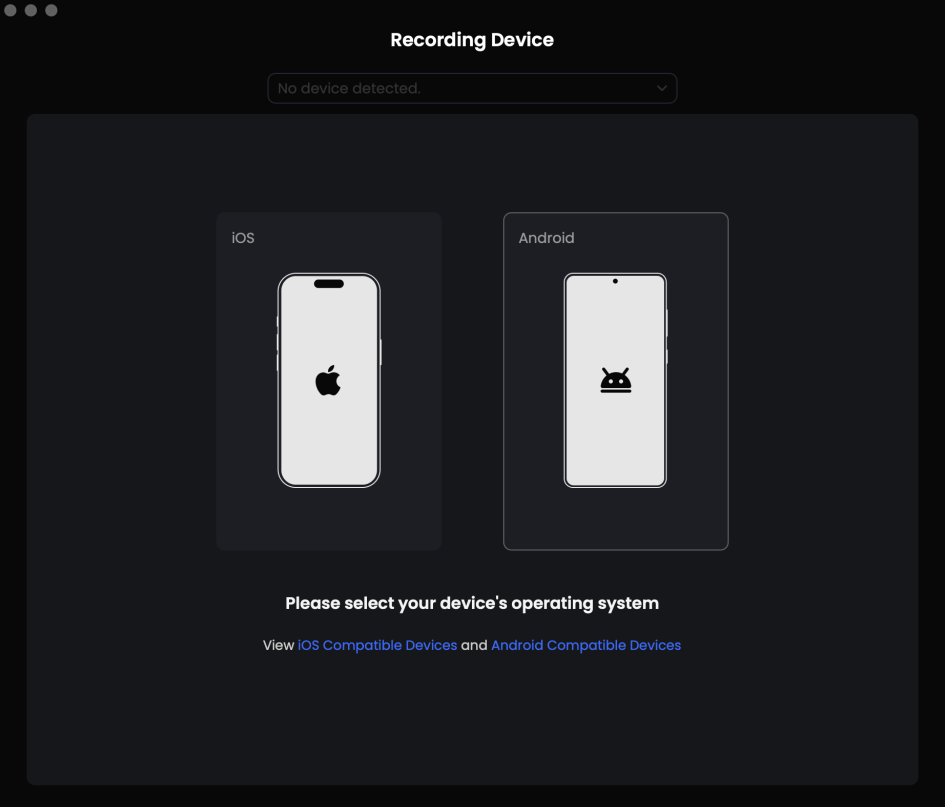
Step 1. Install and launch FocuSee on your Windows or Mac computer. Select Device mode and choose iOS.
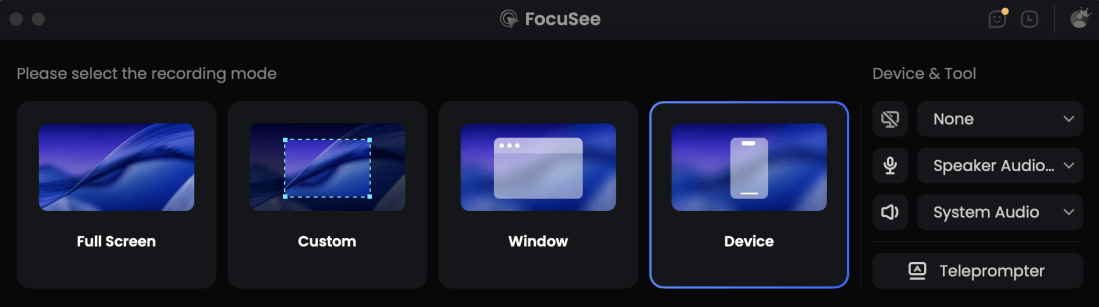
Choose the Device Recording Model
Step 2. Connect your iPhone or iPad to the computer via USB and tap Trust This Computer on your device. Once the screen is mirrored, click REC to start recording.
Connect your mobile device
Step 4. Perform the actions on your iPhone as usual. Click REC again to stop, then apply zoom, focus effects, and subtitles if needed.
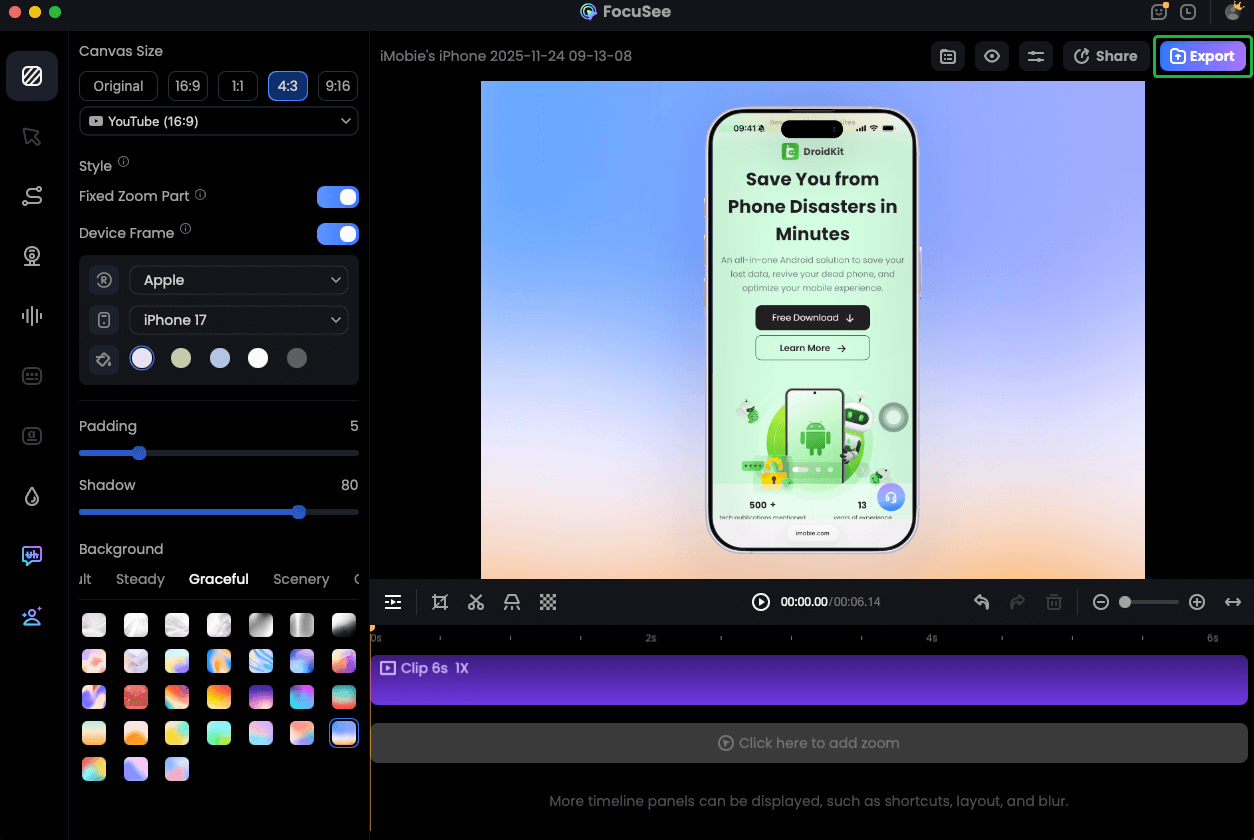
Record iPhone Screen
Step 5. Export the final video in MP4 or GIF format.
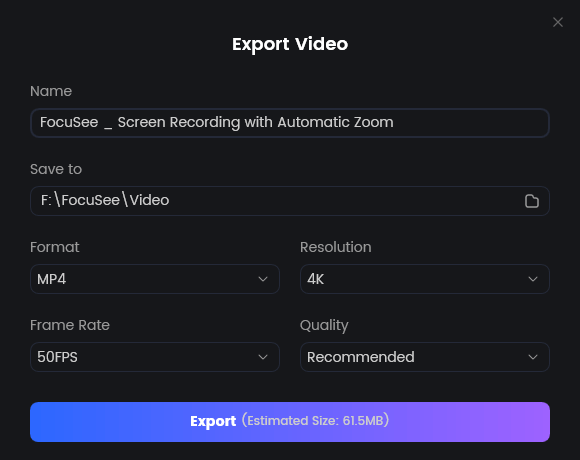
Export Your Video
Native recording is great for capturing what happened. FocuSee is for making sure people understand what happened.
FAQ: Common Questions About iPhone 13 Screen Capture
How to screen record on iPhone 13 Mini or iPhone 13 Pro Max?
The architecture of iOS 17 and iOS 18 is identical across the entire 13 series. Whether you use the compact Mini or the flagship Pro Max, the Control Center method described in Phase 1 is the same.
Can I screen record FaceTime with audio?
You can record the video of a FaceTime call, but audio is complicated. You will record your own voice (if the mic is on), but the other person’s audio is often muted by the system to comply with wiretapping and privacy laws. It is generally not a reliable way to interview someone.
How long can you screen record on an iPhone 13?
There is no software time limit. You are limited only by your available iPhone storage and battery life. We recommend keeping recordings under 30 minutes to prevent the device from heating up or crashing during the “save” process.
Why does my recording stop when the phone locks?
Screen recording requires the screen to be active. If your display goes to sleep (Auto-Lock), the recording will stop. To record long processes, go to Settings > Display & Brightness > Auto-Lock and set it to Never temporarily.