How to Screen Record on iPhone 12: The Ultimate Guide (With Sound & Pro Tips)

Facing a locked device or a silent video when you need it most can be a significant obstacle. We recently observed a user, Ryan, who needed to send a quick walkthrough to a friend. He bought a refurbished iPhone 12, but when he tried to record, he hit a wall: the video had absolutely no sound, and once he finished, the file was too large to send via Discord.
If you are struggling because you can’t find the Screen Record button, your microphone audio is muffled, or your files are too large to share, you are not alone. The iPhone 12 hardware is powerful, but the software interface can be deceptive. Whether you are using the standard model, the Mini, or learning how to screen record on iPhone 12 Pro Max, the underlying procedure is identical. This guide provides the tested solutions to capture, trim, and polish your recordings without frustration.
Quick Start: Enable and Start Screen Recording on iPhone 12
Before you can capture anything, you must ensure the tool is accessible. A common user pain point is swiping open the menu and finding the button missing. Here is the fix to add the Screen Recording button to your active tools.
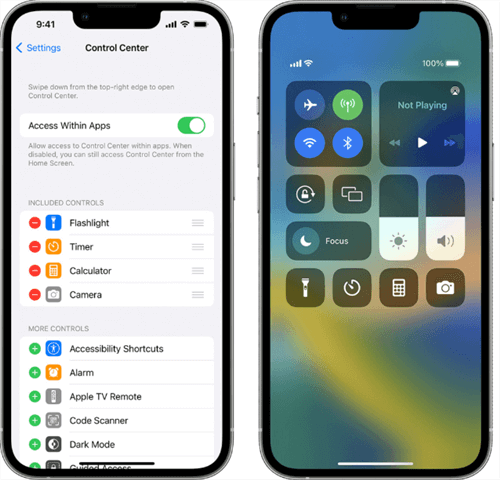
Part 1: Adding the Button to Control Center
If you have never used this feature before, it is likely disabled by default.
Step 1. Open the Settings app on your iPhone 12.
Control Center
Step 2. Scroll down and tap Control Center.
Step 3. Look under the “More Controls” list for Screen Recording.
Step 4. Tap the green + (plus) icon next to it. This moves it to the “Included Controls” section at the top.
Part 2: Starting (and Stopping) the Capture Properly
Step 1. Once added, the process to screen record on iPhone 12 becomes a simple gesture. However, how you stop the recording matters if you want a clean video.
Step 2. Swipe down from the top-right corner of your screen (where the battery icon is) to open Control Center.
Step 3. Tap the Screen Recording button (a solid circle inside a ring).
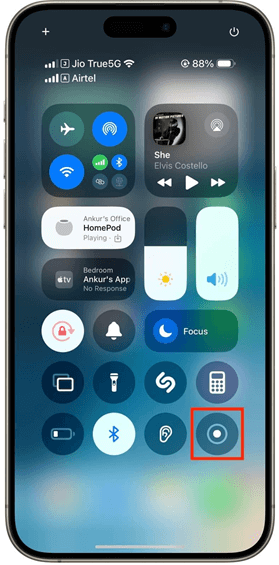
Tap Record
Step 4. You will see a 3-second countdown inside the icon. Close the Control Center immediately.
Step 5. A red time indicator (status bar) will appear in the top-left corner, confirming the recording is active.
Pro Tip for Stopping: Do not swipe down to open the Control Center again to stop; this records the menu overlay and ruins the end of your clip. Instead, tap the red time indicator in the top-left corner of your screen and select Stop. The video automatically saves to your Photos app.
Audio Guide: How to Screen Record on iPhone 12 With Sound
The most common frustration users face is audio confusion. This happens because iOS separates internal audio (what the phone plays) from microphone audio (your voice).
Clarifying Audio Channels: Read This First
- Microphone OFF (Default): The iPhone will still record internal sounds (game music, app sound effects, YouTube audio) in high quality. Keep the mic off if you want a clean recording of a game or video without hearing your own breathing or background noise.
- Microphone ON: This records both your voice (external) and the system sound (internal). Use this for tutorials or commentary.
If you want to know how to screen record on iPhone 12 with sound (specifically your voice), you must use the “Long Press” technique.
The “Long Press” Secret for Voiceover
- Open Control Center.
- Press and hold (Long Press) the Screen Recording button rather than just tapping it.
- A new menu will appear. Tap the Microphone icon at the bottom to toggle it to “Microphone On.”
- Tap Start Recording from this menu.
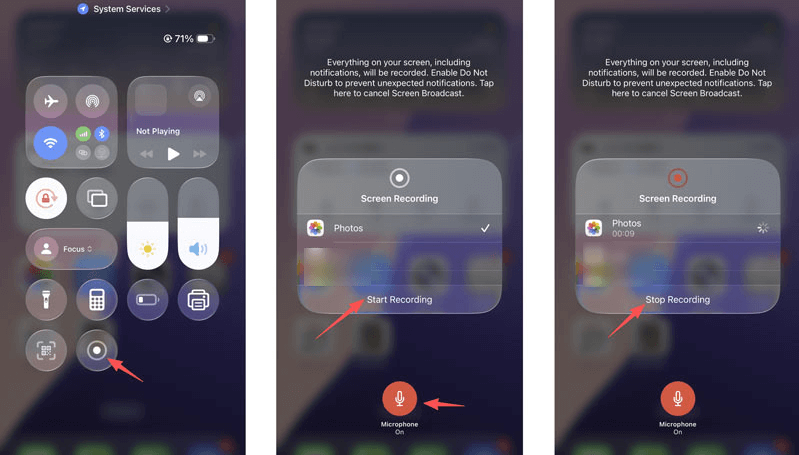
Record Internal Audio on iPhone
Expert Insight: Why Recordings Go Silent
Here is a critical tip that most other guides miss, and it is something we verified during our testing: Bluetooth interference.
Many silent recordings occur even with the mic on because audio is being routed to Bluetooth devices. If you are wearing AirPods, the iPhone 12 may attempt to capture audio through them, which can sometimes result in desyncing or silence depending on the app.
For the most reliable system sound capture:
- Disconnect Bluetooth devices if you don’t need them.
- Ensure your physical ringer switch is not on silent if you are relying on app sounds.
- Always test a 5-second clip before recording something important to ensure your audio levels are balanced.
Quick Fix: How to Trim & Share Without a Computer
A major issue users encounter is file size. Screen recordings are high-definition video files; even a 30-second clip can be too large to send via Discord, email, or Slack. You do not need a computer to fix this.
Here is how to use the native iOS editing tools to trim the dead air (like the start and stop moments) and reduce file size instantly:
Step 1. Open the Photos app and select your screen recording.
Step 2. Tap Edit in the top-right corner.
Step 3. Locate the video timeline at the bottom of the screen (it looks like a strip of film).
Step 4. Drag the yellow handlebars at the beginning and end of the timeline inward. This crops out the setup time and the moment you stopped the recording.
Step 5. Tap the Play button to preview your new cut.
Step 6. Tap Done in the top-right corner.
Step 7. Select Save Video as New Clip. We recommend this option so you keep the original raw footage just in case you trimmed too much. By trimming just 5 seconds off the start and end, you often reduce the file size enough to share it instantly via messaging apps.
Troubleshooting & Privacy: Black Screens and Lost Files
Even with the correct settings, you may encounter specific hurdles. Here is how to troubleshoot common interruptions and missing files.
1. Prevent Interruptions with Focus Mode
Nothing ruins a perfect take like a text message banner popping up. If you want to ensure no private notifications appear during your recording:
- Before you hit record, swipe to open Control Center.
- Tap Focus.
- Select Do Not Disturb.
- This ensures your recording remains clean and private.
2. The “Black Screen” Issue
If you attempt to record apps like Netflix, Disney+, or other streaming services, you will likely see a black screen with audio only. This is not a glitch; it is DRM-protected content. Apple restricts recording copyright-protected video streams at the system level. There is no workaround for this on a non-jailbroken device.
3. Locating Your File
If you cannot see your video in the main Recents feed, it hasn’t vanished. The Photos app sorts items by the date the file was created, not necessarily when you saved it. To find it quickly:
- Open the Photos app.
- Tap the Albums tab.
- Scroll down to “Media Types.”
- Select Screen Recordings. This smart album aggregates every capture automatically.
[Image Placeholder]: A ‘Decision Tree’ infographic: ‘Problem: No Sound -> Check Mic Toggle. Problem: Black Screen -> Check App DRM. Problem: Can’t Find Video -> Check Albums > Screen Recordings.’ Alt-text: Troubleshooting guide for iPhone 12 screen recording not working.
Advanced Tip: When to Use Desktop Editing Tools
For quick demos or casual sharing, your iPhone’s native screen recorder is usually enough. But if you’re creating professional tutorials, product walkthroughs, online courses, or YouTube content, mobile-only tools reach their limits quickly — especially when you need to add editorial polish or refine viewer focus.
What Native Mobile Editing Can’t Do
- Precise focus control: Hard to zoom into specific buttons or UI elements.
- Professional guidance: No cursor visuals or interaction emphasis.
- Advanced enhancements: No auto-captions, noise reduction, or dynamic effects.
- Polished output: Limited export options and resolution control.
How FocuSee Enhances Your Mobile Recordings
FocuSee allows you to capture your iPhone or iPad screen directly on your Windows or Mac computer with higher flexibility and control than on-device tools alone.
- High-Fidelity Capture: Connect your iPhone/iPad to your computer via USB and mirror your device in FocuSee’s interface. FocuSee supports output formats from 480P all the way up to 4K — ideal for crisp tutorials and demos that scale across platforms.
- Edit & refine footage in FocuSee’s timeline.
- Add device frames (e.g., iPhone/iPad border) for a polished presentation.
- Include zoom effects, cursor highlights, captions, and audio enhancements to make your message clearer and more engaging.
- Export in MP4 or GIF format for publishing or sharing.
Desktop Recording Workflow
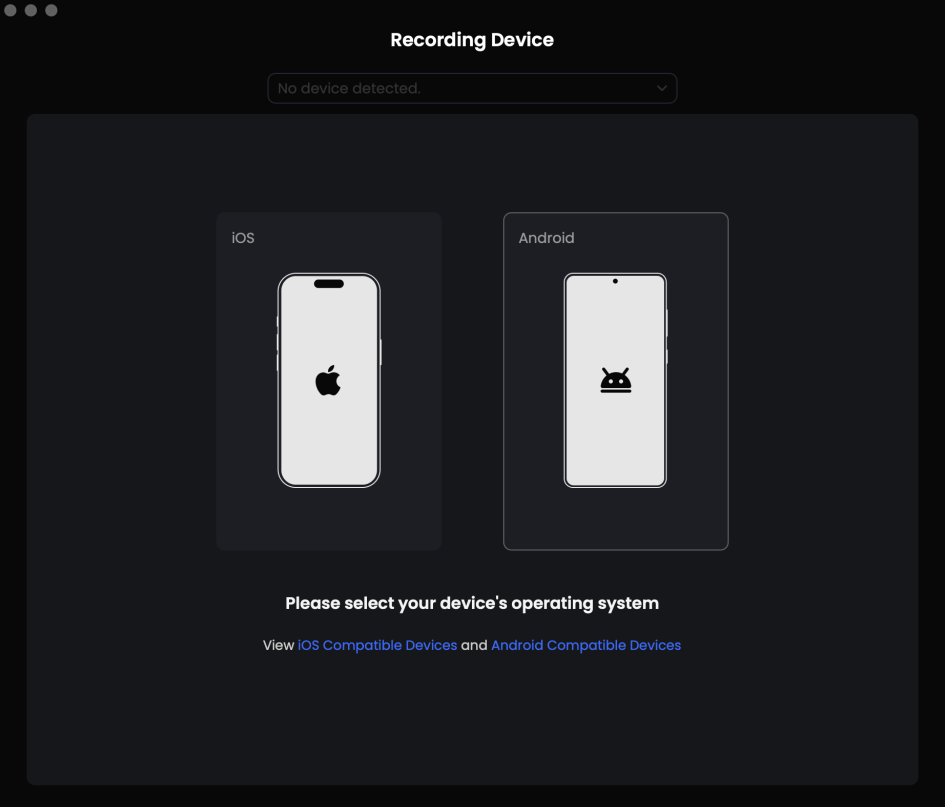
Step 1. Setup: Install and launch FocuSee on your computer, choose your camera and audio sources. Choose “Device” and then “iOS” to prepare for mobile screen capture.
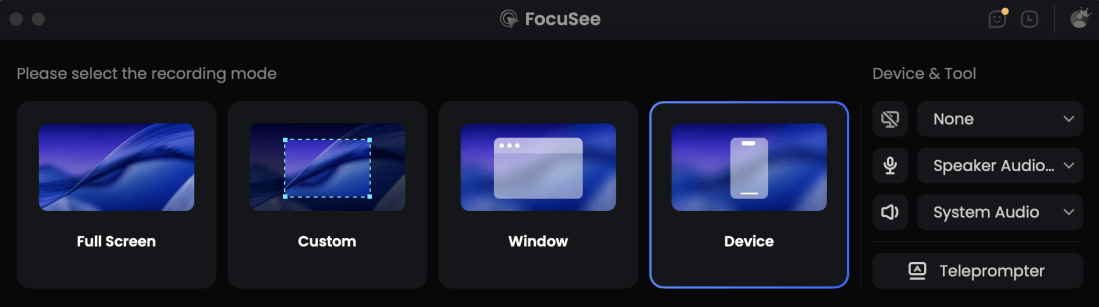
Choose the Device Recording Model
Step 2. Connect & Trust: Plug in your iPhone/iPad, unlock it, and tap Trust This Computer when prompted.
Connect your mobile device
Step 3. Record: Hit the REC button to begin recording your mobile screen mirrored on the desktop.
Step 4. Edit on desktop — add zooms, captions, and focus effects that aren’t available on mobile.
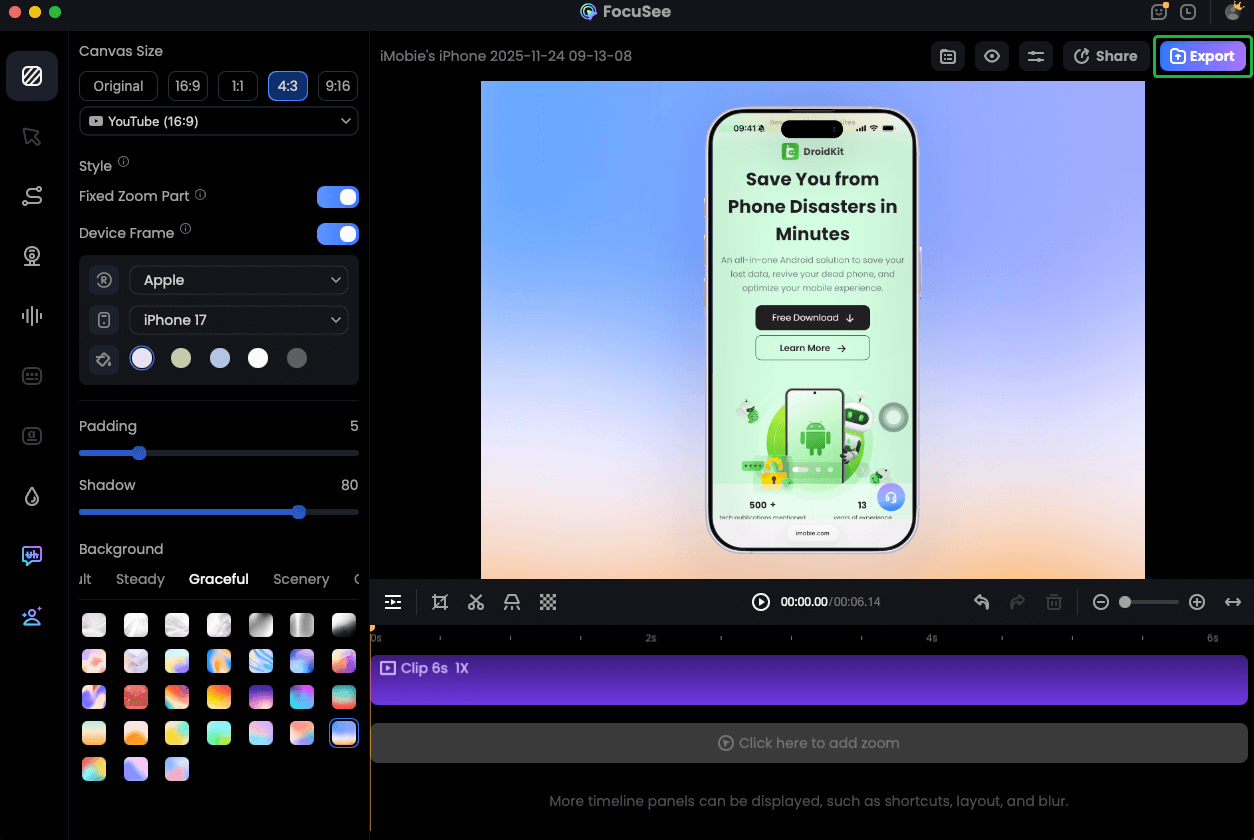
Record iPhone Screen
Step 5. Export high-quality output tailored to your audience, whether for YouTube, class materials, or client presentations.
Frequently Asked Questions About iPhone 12 Screen Recording
Can I screen record FaceTime on iPhone 12?
Yes, you can screen record FaceTime on iPhone 12 to capture the video feed. However, due to privacy laws and technical restrictions, the audio capture is often limited. While the internal video records fine, the other person’s audio may not record clearly, depending on your iOS version. Always ask for permission before recording a call.
How long can you screen record on an iPhone 12?
There is no fixed time limit for recording. It depends entirely on your available storage. A 10-minute HD recording can consume several hundred megabytes. If your storage is full, the recording will stop automatically, and you may receive an error message saying “Screen Recording failed to save.”
Why won’t screen recording work on my iPhone 12?
If the button is unresponsive, check your Restrictions settings. Go to Settings > Screen Time > Content & Privacy Restrictions > Content Restrictions. Ensure that Screen Recording is set to “Allow.” Additionally, restart your device if the interface feels buggy, as this often resolves temporary software glitches in iOS.
Conclusion
Mastering how to screen record on iPhone 12 is about knowing which tool to use for the job.
- For quick sharing: Add the button to Control Center, use the “Red Status Bar” to stop cleanly, and use the Photos app to trim the excess.
- For gameplay: Keep the microphone OFF to capture high-quality system audio without background noise.
- For tutorials: Toggle the microphone ON via the long-press menu to narrate your steps.
By following these simple checks—and remembering to enable Do Not Disturb—you can capture clear, helpful videos in seconds, without the frustration of silent clips or black screens.