How to Screen Record on iPhone 11: The Complete Guide

Jenna, an iPhone 11 user, recently hit a wall that many of us face. She needed to show a customer support agent exactly what was failing during a checkout flow in a shopping app. She tried to record her screen, but the resulting video had no sound, and when she tried to email it, the file was too big to send. She was frustrated because she needed to submit proof quickly. After learning the correct method to enable microphone audio alongside system sounds—and discovering how to send large files using a simple iCloud link—she solved her issue in minutes.
If you are wondering how to screen record on iPhone 11, you are in the right place. Whether you need to capture a software bug, save a gaming clip, or create a tutorial, the process is built directly into iOS. To ensure accuracy, I have verified every step in this guide using an iPhone 11 Pro Max running iOS 17.
While the basic function is simple, nuances like how to screen record on iPhone 11 with sound (both your voice and the app audio) or how to share those massive video files without a computer can be tricky. This guide covers the essential setup, the critical audio mixing settings, and the native sharing tricks required to capture and send professional-looking footage.
Quick Start: How to Enable & Use the Native Recorder
By default, the recording tool is hidden. To learn how to turn on screen recording on iPhone 11, you must first add the control to your quick-access menu.
Step 1: Add the Screen Recording Button to Control Center
If you swipe down and do not see the record icon (a solid circle inside a ring), follow this procedure:
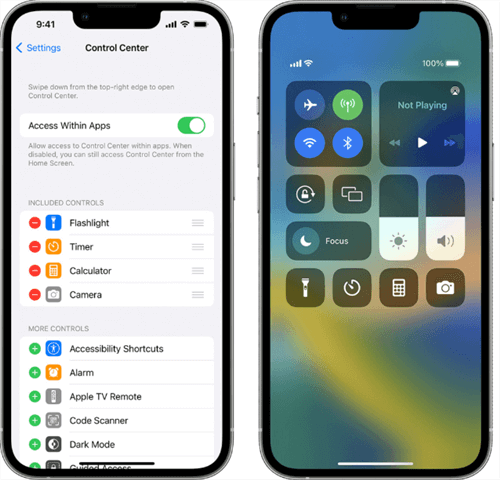
Control Center
- Open the Settings app.
- Tap on Control Center.
- Scroll down to the “More Controls” section.
- Find Screen Recording and tap the green plus (+) icon next to it.
- Optional: You can drag the three lines (≡) next to the tool to rearrange where it appears in your panel. Placing it near the bottom makes it easier to reach with one hand.
Step 2: Start Recording (and Fix the Sound)
Once added, you need to access the Control Center. Since the iPhone 11 series utilizes FaceID and lacks a home button, the gesture is specific:
Swipe down from the top-right corner of your screen. You should aim specifically for the Battery Icon, just to the right of the “notch.”
Here is a critical tip that most other guides miss: how to screen record on iPhone 11 with mic audio involves a specific setting that controls how audio is mixed.
Most users assume that turning on the microphone might mute the app sound, or vice versa. Here is how the audio mixing actually works:
- Option A: System Sounds Only (Default)
- Action: Simply tap the Screen Recording button. A 3-second countdown begins.
- Result: This records the internal audio of the app (game music, video sound, interface clicks). It will not record your voice or background noise.
- Best for: Saving social media clips or recording bugs where you don’t need to speak.
- Option B: Voiceover + System Sounds (The “Gamer” Mode)
- Action: Long-press (press and hold) the Screen Recording button. A menu will pop up. Tap the Microphone icon until it turns red and says “Microphone On.” Then tap “Start Recording.”
- Result: iOS will record both your voice via the microphone AND the internal app audio simultaneously. Note that the system volume may lower slightly (“ducking”) to prioritize your voice.
- Best for: Tutorials, explaining a bug to support, or gaming commentary.
Once you are finished, tap the red status bar (or the red time indicator) in the top-left corner of the “notch” area and select “Stop.” The video will automatically save to your Photos app.
Before You Record: The Privacy & Setup Checklist
In Jenna’s case, the moment of frustration hit when she realized her first recording attempt captured a private text message banner that popped up right over the checkout screen. She had to delete the proof she needed because it leaked sensitive info.
To avoid this common mistake, and to ensure your video actually saves, follow this pre-flight checklist.

Do Not Disturb Mode
1. Enable Focus Mode (Do Not Disturb)
Nothing ruins a perfect take like a notification from a dating app or a bank alert popping up.
- Open Control Center.
- Tap Focus and select Do Not Disturb.
- This suppresses incoming texts, emails, and app notifications so they do not appear in your final video.
2. Check Your Storage (The 100MB Rule)
One of the most common reasons for iPhone 11 screen recording not working or stopping randomly is a lack of space. High-definition video consumes significant storage.
- The Benchmark: A good rule of thumb is that 1 minute of screen recording takes up roughly 60MB to 100MB of space. A 10-minute tutorial can easily exceed 1GB.
- Go to Settings > General > iPhone Storage to check your available space before you start.
3. Close Sensitive Apps
iOS allows you to switch between apps while recording. Ensure apps like Banking, Photos, or Notes are closed so you do not accidentally swipe into them during your demonstration. By taking these precautions, you ensure that the only thing you share with support teams or social media is the content you intended to show.
How to Share Large Recordings (Without a Computer)
A major pain point for iPhone 11 users is the “File Too Large” error when trying to email a screen recording. You do not need to buy third-party software or transfer the file to a computer to solve this. iOS has two powerful, free features built right in.
Method 1: Use “Copy iCloud Link” (Best for Tech Support)
If you need to send a video to a support agent or a friend, sending a link is much faster than sending a file.
- Open your recording in the Photos app.
- Tap the Share icon (square with an arrow).
- Scroll down and select Copy iCloud Link.
- iOS will upload the video to the cloud and copy a URL to your clipboard.
- Paste this link into your email or chat. The recipient can download the full-quality video, and the link expires automatically after 30 days.
Method 2: Mail Drop
If you prefer to attach the file directly to an email:
- Compose your email in the Mail app and attach the video.
- Press Send.
- A popup will appear saying the attachment is too large. Tap “Use Mail Drop.”
- This creates a temporary download link for the recipient, allowing you to send files up to 5GB for free.
For Power Users: Polishing Your Content
While the native iOS recorder combined with iCloud Links is perfect for 90% of users, there are times when “raw” footage isn’t enough. If you are creating a professional tutorial for work, or if you forgot to turn on “Do Not Disturb” and recorded sensitive info, you might need more advanced tools.
Most users think they need to re-record the whole video if they make a mistake. However, shifting your workflow to a desktop editor can save the footage you already have.
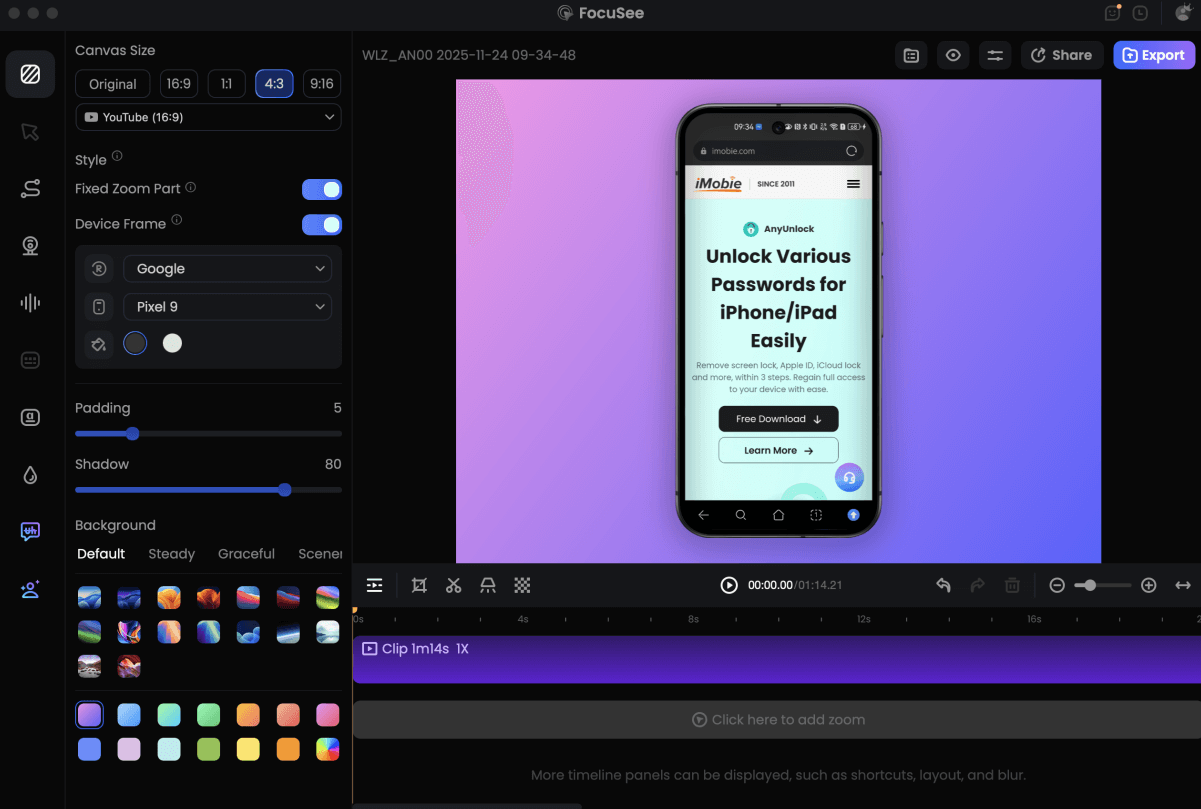
When to Consider a Desktop Tool (like FocuSee)
If you are recording for a boss, a client, or a public YouTube channel, raw mobile footage has limitations:
- Static Vertical Video: It looks small and hard to read on a desktop monitor.
- Privacy Leaks: You cannot blur out a password or email address inside the iPhone Photos app.
- Lack of Emphasis: You cannot highlight where you are tapping.
FocuSee is a helpful tool for these specific “post-production” scenarios. It allows you to transfer your raw iPhone video to a Mac or Windows PC, where it automatically applies zoom effects to follow the action (making vertical video look better on horizontal screens). Crucially, it allows you to add a blur effect over sensitive data after you have recorded it, saving you from having to do a retake.
Record Android Phone Screen
Troubleshooting: Why iPhone 11 Screen Recording Fails
Even with the correct settings, you might encounter errors. In most cases, this is not a hardware failure but a software restriction. Use this guide to diagnose the problem.
1. The “Black Screen Issue” (DRM Protection)
If you try to screen record apps like Netflix, Disney+, Hulu, or Apple Music, the resulting video will be a black screen with audio. This is intentional. These apps use DRM (Digital Rights Management) to block screen capture of copyright-protected content. The system detects the recording and blacks out the video feed automatically. There is no workaround for this; it is a legal protection built into iOS.
2. No Sound in Recording
If your video is silent, double-check your mixing settings:
- Did you do the Long Press? As mentioned in Step 2, you must toggle the “Microphone On” setting to capture your voice.
- Is the Ringer On? While screen recording usually captures internal audio regardless of the ringer switch, some specific games mute their output if the physical Silent Switch (on the side of the iPhone 11) is showing orange. Flip it to Ring mode just to be safe.
3. “Screen Recording Failed to Save”
This error almost always points to storage full.
- Check Settings > General > iPhone Storage.
- If you have less than 200MB free, the recording will fail.
- Expert Tip: Sometimes, the “Temp” files from a failed recording hang around. Restart your iPhone 11 (Volume Up + Power Button) to clear the cache and free up space.
4. Button is Missing
If you cannot find the record icon, revisit Settings > Control Center and ensure it is listed under “Included Controls.” If your device is a work phone managed by an employer (MDM), they may have disabled the Screen Recording feature via a security profile to prevent data theft. You cannot bypass this restriction on a managed device.
Frequently Asked Questions
Where do my screen recordings go on iPhone 11?
Once you stop the recording, the file is automatically saved to the Photos app. You can find it in your main “Library” tab (it will be the most recent item) or under the “Media Types” section in the Albums tab, specifically in the Screen Recordings album.
Can I screen record FaceTime or a phone call on iPhone 11?
You can record the video of a FaceTime call, but capturing the audio is complicated. Due to wiretapping regulations, Apple often restricts the microphone from recording the other person’s voice during a call. Usually, the recording will capture your voice (if the mic is on) but the other person will be silent.
How do I screen record Snapchat on iPhone 11?
The procedure is the same as any other app: open the Control Center and tap the button. However, be fully aware that Snapchat detects screen recordings. It will send a notification to the other user stating that you have recorded their Snap or Story.
How long can I screen record on iPhone 11?
There is no hard time limit imposed by iOS. You can record for as long as you have available battery life and storage space. However, we recommend stopping every 30 minutes to save the file. Extremely long files (1 hour+) can take a very long time to save and may cause the Photos app to crash or the phone to overheat.
How do I trim the beginning and end of my recording?
You don’t need a computer for simple edits.
- Open the video in the Photos app.
- Tap Edit in the top right corner.
- Drag the yellow handles at the bottom of the screen to cut out the part where you are swiping the Control Center open or closed.
- Tap Done and choose “Save Video” (overwrites original) or “Save Video as New Clip.”
Conclusion
Facing a locked device or a silent video when you need to capture critical information can be a significant obstacle. However, once you master how to screen record on iPhone 11—specifically the long-press gesture for audio mixing and the “Copy iCloud Link” trick for sharing—you can capture bugs, tutorials, and clips with confidence.
While the native tool handles the heavy lifting for 99% of daily tasks, remember that storage management and privacy checks are your best friends for a smooth experience. By following the audio and sharing steps outlined above, you can turn a frustrating tech support moment into a solved problem in minutes.