Pan and Zoom Final Cut Pro: The Ultimate Guide to Cinematic Motion (2025)

Nothing kills viewer retention faster than static, lifeless visuals. If your video feels more like a PowerPoint presentation than a film, the audience will disengage because the imagery lacks momentum. The solution isn’t necessarily buying a more expensive camera; it is mastering pan and zoom Final Cut Pro workflows.
Pan and Zoom Final Cut Pro
By learning how to pan and zoom in Final Cut Pro, you can guide your viewer’s eye, reveal hidden details, and add a layer of professional polish that distinguishes amateur clips from broadcast-quality edits. This guide, tested on the latest Apple Silicon setups, cuts through the confusion between the Ken Burns tool and manual keyframing. We will walk you through the exact methods to fix abrupt zooms, control speed, prevent blurry footage, and automate complex motion for screen recordings.
Ken Burns vs. Keyframes vs. Automation (Quick Decision Guide)
Before opening a single menu, you must choose the right tool for the job. Final Cut Pro offers native tools for motion, but third-party automation is often superior for specific workflows like screen recordings. Choosing the wrong method often leads to wasted time or jerky, unnatural motion.
Here is a strategic breakdown to help you decide immediately:
| Feature | Ken Burns Tool | Manual Keyframing | Automated Smart Zoom (FocuSee) |
| Ideal Use Case | Simple photo or clip movement (documentary style) | Cinematic motion with custom timing | Screen recordings, tutorials, software demos |
| Control Level | Low (start/end only) | High (frame-by-frame easing) | Automated (follows cursor/actions) |
| Setup Time | Fast (< 30 seconds) | Slow (manual tuning) | Instant (auto-generated) |
| Smoothness | Fixed ease-in/out | Fully customizable (Bezier curves) | Software-optimized smooth zoom |
If you need to quickly animate a still photo, the Ken Burns tool is your most efficient option. If you require cinematic movement where the camera speeds up or slows down at specific moments to match a music beat, you must use manual keyframing. However, if your project involves screen capture, using manual keyframes is often inefficient; in that scenario, an automated tool provides the best return on time invested.
Using the Ken Burns Effect in Final Cut Pro (Best for Beginners)
The Ken Burns effect is the industry-standard technique for adding motion to still imagery. It is natively built into the crop and scale Final Cut Pro workflow and is ideal for beginners because it automates the path for you. By simply defining a start and end point, you can turn a boring slide into a dynamic element.
Step 1. Select Your Clip: Click on the photo or video clip in your timeline.
Step 2. Access the Crop Tool: In the bottom-left corner of the Viewer window, click the ‘Crop’ icon (or press Shift + C).
Step 3. Choose Ken Burns: Select the ‘Ken Burns’ tab at the top of the Viewer.
Ken Burns Effect in Final Cut Pro
Step 4. Set the Animation: You will see two labeled box overlays:
- Green Box (Start): Resize and position this box to define where the camera view begins.
- Red Box (End): Resize and position this box to define where the view finishes.
Step 5. Preview and Done: Press the ‘Done’ button in the top right to apply the effect.
For a simple zoom in and out Final Cut Pro effect, place the Green box on the full image and the Red box on a specific detail (like a face or a product). The software automatically interpolates the movement between these two points.
Crucial Tip: Controlling Speed and Easing
Beginners often ask, “How do I make the zoom faster?” In the Ken Burns tool, speed is determined by the duration of the clip.
- To Speed Up: Shorten the clip in the timeline. The movement will happen faster because it has less time to travel from the Green box to the Red box.
- To Slow Down: Extend the clip length.
The Ken Burns tool automatically applies an “Ease In” and “Ease Out” effect, meaning the movement starts slowly, speeds up, and slows down again at the end. You cannot easily disable this within the Ken Burns tool. If you need a constant, linear speed (robotic movement), you must use Method 2 below.
Pro Tip: If you want to swap the direction of the movement (e.g., turn a Zoom In into a Zoom Out), click the small “Swap” arrow icon in the top left of the Viewer while the tool is active.
Cinematic Control with Keyframes and the Transform Tool
While the Ken Burns tool is fast, it lacks nuance. Many editors overuse it because it’s quick, but it offers limited control. For professional results—especially with video footage—combining the transform tool Final Cut Pro with keyframes produces smoother video motion effects and allows you to hold a zoom for a specific amount of time.
To achieve this level of control, you must move beyond presets and use manual keyframes in Final Cut Pro.
The Manual Keyframing Workflow
Open the Transform Tool: Select your clip and press Shift + T. Ensure the blue “Transform” icon is active in the Viewer; otherwise, you won’t see your motion path later.
Add the First Keyframe: Move the playhead to the exact frame where you want the motion to start. Click the ‘Keyframe’ button (diamond icon) in the top-left of the Viewer.
Add the Second Keyframe: Move the playhead to the end of the action. Adjust the scale (zoom) and position (pan) of the image using the blue handles in the Viewer. FCP automatically creates a motion path (a red line).
Refine with Easing (The Professional Step): This is where amateurs stop, but professionals continue. Linear movement can feel mechanical. You have two ways to fix this:
- Option A (Viewer Method): With the Transform tool active (Shift + T), look for the red motion path line in the Viewer. Right-click on one of the white diamond points on that line and select ‘Smooth’. Note: If the movement is subtle, this line may be very short and hard to click.
- Option B (Timeline Method – Recommended): Select your clip and press Control + V. This opens the Video Animation editor directly on the timeline clip.
- Look for the ‘Transform’ row.
- Click the small arrow on the right of the Transform row to expand it.
- You will see your keyframes as diamonds. You can drag them left or right to change timing.
- To smooth the motion, right-click the path in the Viewer (as in Option A) or adjust the curve handles if available in the expanded view.
Selecting ‘Smooth’ applies ease-in and ease-out physics to your movement. This means the motion accelerates gently at the start and decelerates at the end, rather than starting and stopping abruptly. This subtle adjustment mimics the operation of a high-end physical camera lens.
Automating Pan and Zoom for Screen Recordings with FocuSee
If you are creating software tutorials, product demos, or educational course material, manually keyframing is often a nightmare.
The Pain of Manual Tracking:
Imagine recording a 10-minute tutorial. Every time your mouse moves to click a button, you need to set a start keyframe, an end keyframe, and adjust the position X and Y coordinates. Then you have to zoom out again. A simple 2-minute video could require over 100 manual keyframes. This is inefficient and prone to human error.
For this specific workflow, using a dedicated automation tool like FocuSee is smarter than native editing.
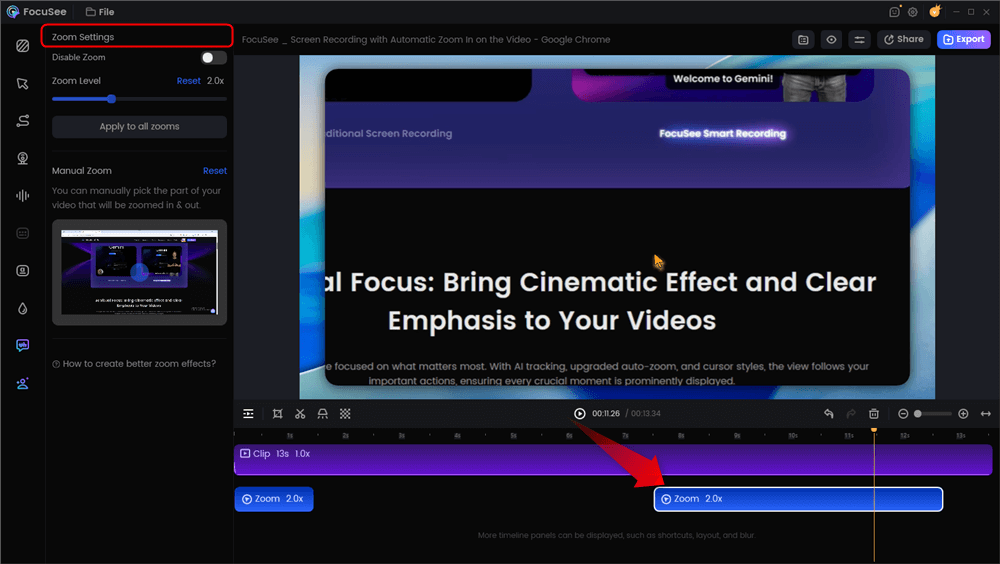
Automatic Zoom Effects
The Automation Advantage
FocuSee is a screen recording and video creation tool designed to automate this exact post-production labor. It directly addresses the problem of robotic or abrupt zooms through its Auto-Zoom feature. Instead of you setting keyframes, FocuSee analyzes your cursor movement and clicks, automatically generating smooth pan and zoom effects that follow the action.
How It Streamlines Your Edit
- Eliminate Manual Tracking: The software detects where the user’s attention should be (e.g., a mouse click on a “Sign Up” button) and zooms in automatically.
- Polished Cursor Effects: To further solve the issue of viewers getting lost on a busy screen, FocuSee applies customizable cursor highlights.
- Export for FCP: You can export the finished video and drop it directly into your Final Cut Pro pan and zoom timeline, bypassing hours of manual retiming and animation work.
This method is distinct from general video editing; it is a specialized solution for creators who need to produce high-volume instructional content without sacrificing visual quality.
Troubleshooting: Why Your Zooms Look Blurry or Choppy
A frequent obstacle editors face is discovering that “zooming in makes my footage or photos look blurry.” This usually stems from a misunderstanding of resolution limits rather than a software error. When you zoom into a video clip, you are essentially cropping pixels.
The Resolution Rule
If you zoom 200% into a 1080p clip on a 1080p timeline, the software must “invent” pixels that do not exist, resulting in a soft, pixelated image. To prevent this, you must plan your resolution strategy:
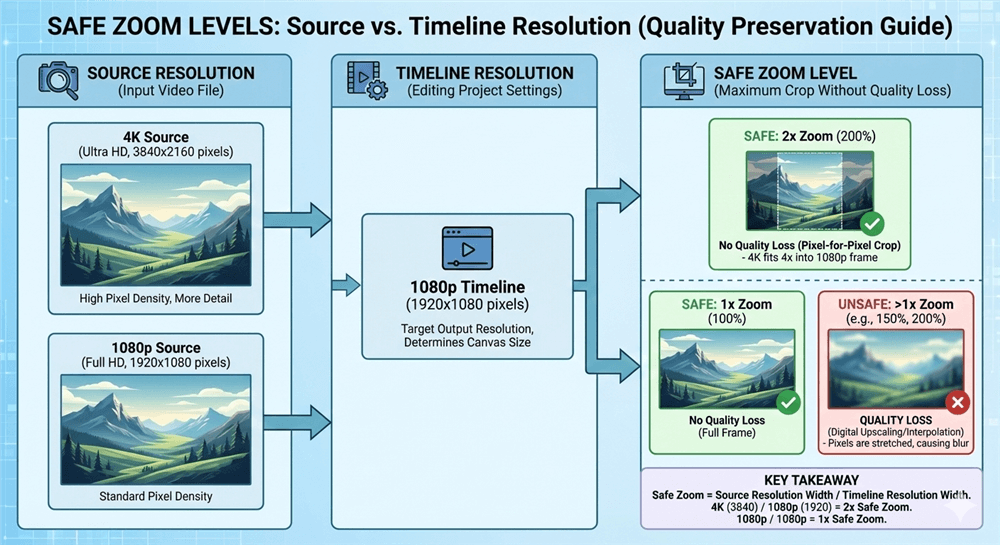
Safe Zoom Levels
Use High-Resolution Source Media: Start with 4K (3840×2160) footage or high-megapixel photos, even if your final project is 1080p.
Calculate Safe Zoom Levels: A 4K clip on a 1080p timeline allows you to zoom in up to 200% (Scale 2.0) without any loss of quality. Beyond that threshold, degradation begins.
Check Spatial Conform (Crucial Setting): This is where many users get lost.
- Select your clip in the timeline.
- Go to the Inspector (top right of the screen).
- Click the Video Inspector tab (the film strip icon).
- Scroll down to Spatial Conform.
- Set Type to ‘None’.
- Why? By default, FCP sets this to ‘Fit’, which scales your 4K footage down to 1080p immediately. Setting it to ‘None’ displays the clip at full size (1:1 pixel mapping), giving you the actual resolution headroom to zoom and pan without blur.
Fixing “Choppy” Motion
If your issue is that the motion looks jerky (stuttering) rather than blurry, the culprit is likely a lack of easing (as discussed in Method 2) or a frame rate mismatch. Always ensure your keyframes use ‘Smooth’ interpolation to avoid mechanical starts and stops that disrupt the viewer’s experience.
Frequently Asked Questions About FCP Motion Effects
How do I apply pan and zoom to photos in Final Cut Pro?
The most efficient way is to use the Ken Burns tool. Select the photo, press Shift + C, and choose Ken Burns. This automatically adds a start and end point. For professional image animation, Final Cut Pro requires high-resolution photos (JPEGs or PNGs) to ensure the zoom remains sharp.
Can I reuse the same pan and zoom effect on multiple clips?
Yes, you can batch-apply effects to save time. Apply your pan and zoom effect Final Cut Pro settings to the first clip. Select that clip and press Command + C (Copy). Then, select the other clips you wish to animate, press Command + Shift + V (Paste Attributes), and check the boxes for ‘Transform’ or ‘Crop’ depending on which tool you used. This applies the same motion parameters to the selected clips.
Does pan and zoom reduce video quality?
It reduces quality only if you scale the image beyond its native resolution relative to the timeline. For example, scaling a 1080p clip to 150% on a 1080p timeline will reduce sharpness. Using 4K footage on a 1080p timeline allows you to zoom significantly without quality loss.
How do I reset the pan and zoom if I make a mistake?
If you used the Transform tool, click the “Reset” (curved arrow) icon next to the Transform parameter in the Inspector window. If you used the Ken Burns/Crop tool, press Shift + C and click “Reset” in the Viewer overlay to clear the start and end points.
Conclusion
Static footage is often the primary reason viewers click away, but you now have the tools to solve this. Whether you are using the Ken Burns effect for quick documentary-style movement or mastering manual keyframes for precise cinematic control, applying these techniques will instantly elevate the production value of your edits. You no longer need to accept blurry zooms or robotic movement.
If you find yourself spending hours manually keyframing screen recordings and tutorials, remember that efficiency is just as important as creativity. Tools like FocuSee can automate the heavy lifting of pan and zoom for screen captures, allowing you to regain control of your time and focus on the story you want to tell. Download FocuSee today to streamline your workflow and keep your audience engaged from the first frame to the last.